Looking for a dessert that bursts with flavor and looks impressive? Strawberry Lemon Cheesecake Bars might be your new favorite treat. These bars blend fresh strawberries and zesty lemon for a sweet and tangy delight. Plus, they’re easy to make! In this guide, I’ll share everything you need to know: ingredients, step-by-step instructions, and tips for success. Get ready to impress your friends and family with this delicious dessert!
Why I Love This Recipe
- Delicious Combination: The pairing of strawberries and lemon creates a refreshing and tangy flavor profile that is perfect for any occasion.
- Easy to Make: This recipe is straightforward, with simple steps that even novice bakers can follow with confidence.
- Perfectly Creamy: The cheesecake filling is rich and creamy, providing a delightful contrast to the fresh fruit topping.
- Beautiful Presentation: These bars are visually stunning, making them an impressive dessert to serve at gatherings or special occasions.
Ingredients
Complete List of Ingredients
- 1 ½ cups graham cracker crumbs
- ½ cup unsalted butter, melted
- 1/3 cup granulated sugar (for crust)
- 16 oz cream cheese, softened
- 1 cup powdered sugar
- 2 large eggs, at room temperature
- 1 teaspoon vanilla extract
- Zest of 1 lemon (about 1 tablespoon)
- 1/4 cup fresh lemon juice (about 1 large lemon)
- 1 ½ cups fresh strawberries, hulled and sliced
- 1 tablespoon cornstarch
- Additional powdered sugar for dusting (optional)
Ingredient Descriptions
Graham cracker crumbs serve as the base for the crust. You can buy them or make your own by crushing graham crackers. Unsalted butter adds richness and binds the crust together. Be sure to melt it before mixing. Cream cheese is the star of the cheesecake filling. Use full-fat cream cheese for the best texture. Powdered sugar sweetens the filling and helps it stay smooth without any graininess. Eggs add structure and a creamy texture to the filling. Room temperature eggs mix better. Vanilla extract brings warmth and depth to the flavor profile, balancing the tartness of the lemon. Lemon zest adds a bright, fresh taste. Use a microplane for fine zesting. Fresh lemon juice gives a tangy kick, enhancing the cheesecake’s flavor. Fresh strawberries add sweetness and a pop of color. Use ripe, hulled strawberries for the best taste. Cornstarch helps the strawberry juices thicken and prevents a soggy filling. Additional powdered sugar can be sprinkled on top for a lovely finish.
Substitutions and Modifications
You can make this recipe vegan by using a plant-based cream cheese. Use flax eggs instead of regular eggs. For a gluten-free version, swap graham crackers for gluten-free ones. Honey or maple syrup can replace granulated sugar, but adjust the amounts to taste. If you can’t find fresh strawberries, frozen ones work too. Just thaw and drain excess moisture.
Step-by-Step Instructions
Preparation Steps Breakdown
1. Preheat the Oven: Start by setting your oven to 325°F (160°C). This ensures the oven is hot enough for baking.
2. Make the Crust: In a bowl, mix together 1 ½ cups of graham cracker crumbs, ½ cup of melted butter, and 1/3 cup of granulated sugar. Stir until it looks like wet sand. Press this mixture firmly into a greased 9x9 inch baking pan. Bake for 10 minutes until it’s slightly golden. Let it cool completely.
3. Prepare the Cheesecake Filling: In a large bowl, use an electric mixer to beat 16 oz of softened cream cheese until smooth. Gradually add 1 cup of powdered sugar, mixing until it’s silky and lump-free.
4. Add Eggs and Flavor: Add 2 large eggs one by one, mixing well after each. Then stir in 1 teaspoon of vanilla extract, the zest of 1 lemon, and 1/4 cup of fresh lemon juice until smooth.
5. Layer the Strawberries: In a small bowl, toss 1 ½ cups of sliced strawberries with 1 tablespoon of cornstarch. This helps to thicken the juices for later.
6. Assemble the Bars: Pour half of the cheesecake mixture into the cooled crust. Spread it evenly. Next, layer the strawberries on top, then pour the rest of the cheesecake mixture over them. Smooth the top gently.
Baking and Cooling Instructions
7. Bake: Place the assembled bars in the oven and bake for 35-40 minutes. They’re done when the edges are set, and the center has a slight jiggle. This means they’ll be creamy.
8. Cool and Chill: After baking, let the bars cool at room temperature for about an hour. For the best taste and texture, chill the bars in the fridge for at least 4 hours or overnight.
Serving Suggestions
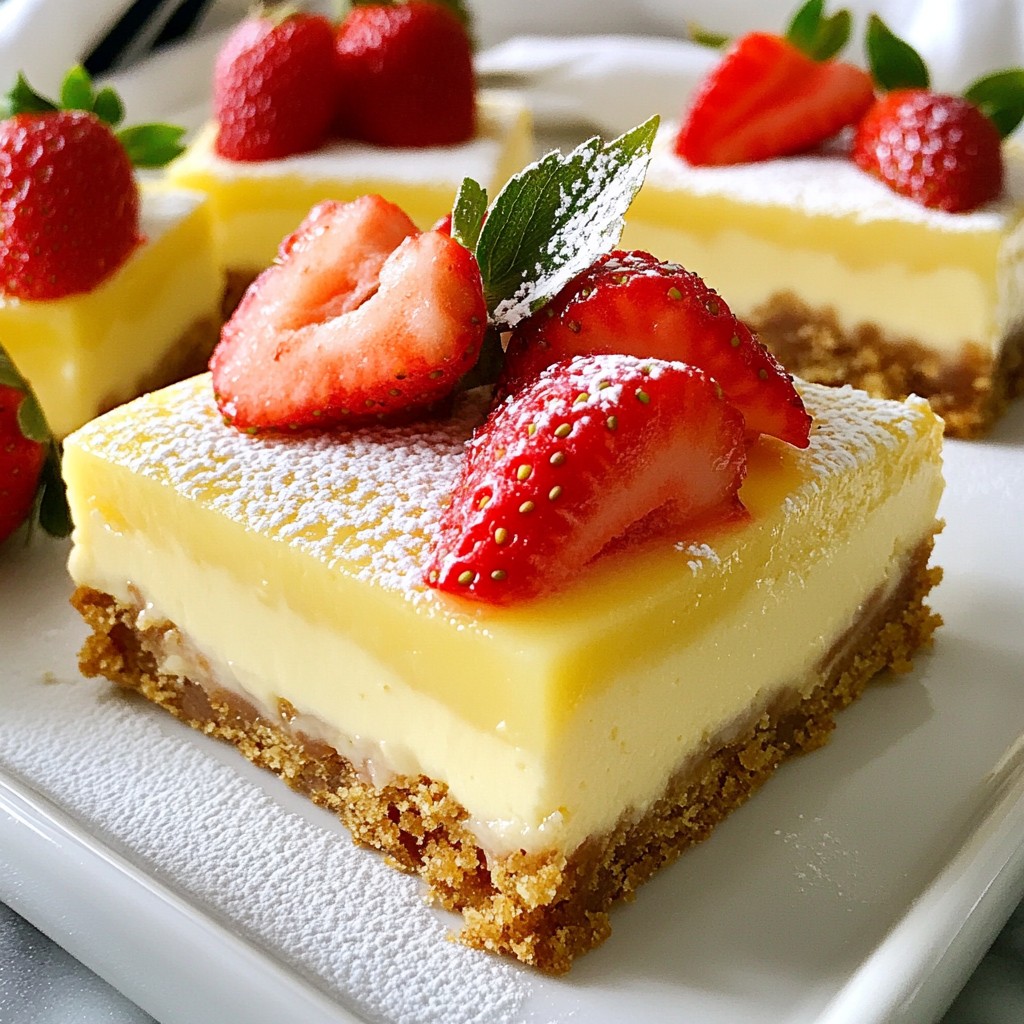
9. Serve: Once chilled, lift the bars out using the edges of parchment paper. Cut them into squares. For an elegant touch, dust with additional powdered sugar.
10. Presentation Tips: Serve the bars on a nice platter. Garnish with fresh strawberry slices and a mint sprig for an eye-catching look.
Tips & Tricks
How to Get the Perfect Cheesecake Texture
To get a smooth and creamy cheesecake, start with softened cream cheese. Cold cream cheese can lead to lumps. Use an electric mixer on medium speed to blend until smooth. Add the eggs one at a time, mixing well after each. This helps keep the texture light. Bake at 325°F (160°C) until the edges are set, but the center still jiggles slightly. This will give you a soft, custardy texture that melts in your mouth.
Common Mistakes to Avoid
Avoid overmixing the batter. This can add too much air, causing cracks. Also, do not skip the chilling time. Chilling helps the bars firm up and enhances the flavors. Be careful with the strawberries; too much moisture can make the bars soggy. Toss them with cornstarch to help absorb excess juice. Lastly, make sure your baking pan is properly greased to prevent sticking.
Best Practices for Cutting and Serving Bars
Cutting cheesecake bars can be tricky. Use a sharp knife dipped in hot water for clean cuts. Wipe the knife between cuts to keep the edges neat. For serving, use parchment paper to lift the bars out of the pan easily. Place the bars on a decorative platter to impress your guests. Dust with powdered sugar for a lovely finish. You can add fresh strawberry slices and a mint sprig for extra flair. Enjoy the delightful flavors and beautiful presentation!
Pro Tips
- Use Room Temperature Ingredients: Make sure your cream cheese and eggs are at room temperature before mixing. This helps create a smoother batter without lumps.
- Don’t Overmix: When combining the eggs into the cheesecake mixture, mix just until incorporated. Overmixing can introduce too much air, causing cracks in the bars as they cool.
- Chill for Best Results: For the best flavor and texture, allow the cheesecake bars to chill overnight. This will let the flavors meld beautifully and the texture to firm up perfectly.
- Layering Strawberries: Make sure to coat the sliced strawberries with cornstarch before layering them in the filling. This will help absorb excess moisture and keep the cheesecake filling from becoming watery.
Variations
Seasonal Fruit Adaptations
You can easily switch fruits in this recipe. Try using ripe raspberries or blueberries instead of strawberries. These fruits add a new twist and vibrant color to your bars. If you pick blackberries, they will give a fun tartness. Mix and match fruits based on what's in season.
Flavor Enhancements
Want to change the flavor? You can add chocolate chips for a rich taste. Just mix in half a cup with the cream cheese filling. Almond extract also works well. Use it in place of vanilla for a nutty hint. Both options add layers of flavor and excitement to your dessert.
Dietary Variations
If you're looking for a keto-friendly version, you can make some easy swaps. Use almond flour instead of graham cracker crumbs for the crust. Replace sugar with a keto sweetener, like erythritol. Cream cheese is already low in carbs, so you're mostly set! This way, you can enjoy cheesecake bars while keeping your diet on track.
Storage Info
Refrigeration and Freezing Guidelines
To keep your strawberry lemon cheesecake bars fresh, store them in the fridge. Use an airtight container to prevent them from drying out. You can also wrap them tightly in plastic wrap for extra protection. If you want to freeze them, cut the bars into squares. Place them in a single layer on a baking sheet. Once frozen, transfer them to a freezer-safe container. They can last up to three months in the freezer.
How Long Do They Last?
In the fridge, these bars stay tasty for about five days. They should be kept covered to stay fresh. If you freeze them, they can last for three months. However, for the best taste and texture, eat them within one month after freezing.
Tips for Reheating or Refreshing Leftovers
If you want to enjoy your bars warm, gently reheat them. Place a square in the microwave for about 15-20 seconds. Check to make sure it doesn’t get too hot. You can also serve them cold, which many people prefer. If the bars feel a bit dry after freezing, top them with a scoop of whipped cream or fresh strawberries to bring back that delightful flavor.
FAQs
What can I substitute for graham cracker crumbs?
You can use crushed cookies like Oreos or vanilla wafers. You can also try ground nuts or oats for a gluten-free option. Each will give a different taste. Just remember to adjust the sugar if needed.
Can I make this recipe ahead of time?
Yes, you can make these cheesecake bars a day before serving. This gives the flavors time to blend. Just keep them chilled in the fridge until you are ready to serve.
How do I know when the cheesecake bars are done baking?
The edges should be set while the center is slightly jiggly. A slight jiggle shows it will firm up as it cools. If it's too firm, they may be overbaked.
Is it necessary to chill the bars overnight?
Chilling overnight is best for texture and flavor. It allows the bars to firm up completely. If you're short on time, chill for at least four hours.
Can I use frozen strawberries instead of fresh?
Yes, you can use frozen strawberries. Just thaw them and drain excess liquid. This helps keep the filling from becoming too watery.
In this post, we explored the ingredients, instructions, and tips for making cheesecake bars. I shared how to pick the right components and avoid common mistakes. Remember to consider variations and dietary needs, like gluten-free or keto options. Proper storage ensures your treats stay fresh and delicious. I hope you feel ready to create your own tasty cheesecake bars. Enjoy every bite and share with others!