If you love dessert as much as I do, you’re in for a treat! This Oreo Cookies and Cream Icebox Cake is the perfect mix of creamy and crunchy. It’s easy to make, no baking required, and will wow your friends and family. In this post, I’ll break down the ingredients, guide you through each step, and share tips to make it your own. Ready to impress your taste buds? Let’s dive in!
Why I Love This Recipe
- Decadent Layers: This cake combines the rich flavors of cream cheese and whipped cream with the classic taste of Oreos, creating a luscious dessert experience.
- No-Bake Convenience: Perfect for warm days, this icebox cake requires no baking, making it an easy option for any gathering.
- Customizable: Add your favorite toppings or mix-ins, like mini chocolate chips, to personalize it to your taste!
- Impressive Presentation: The layered look of this cake is visually stunning, making it a showstopper at parties and gatherings.
Ingredients
Essential Ingredients for Oreo Cookies and Cream Icebox Cake
To make this tasty treat, you need:
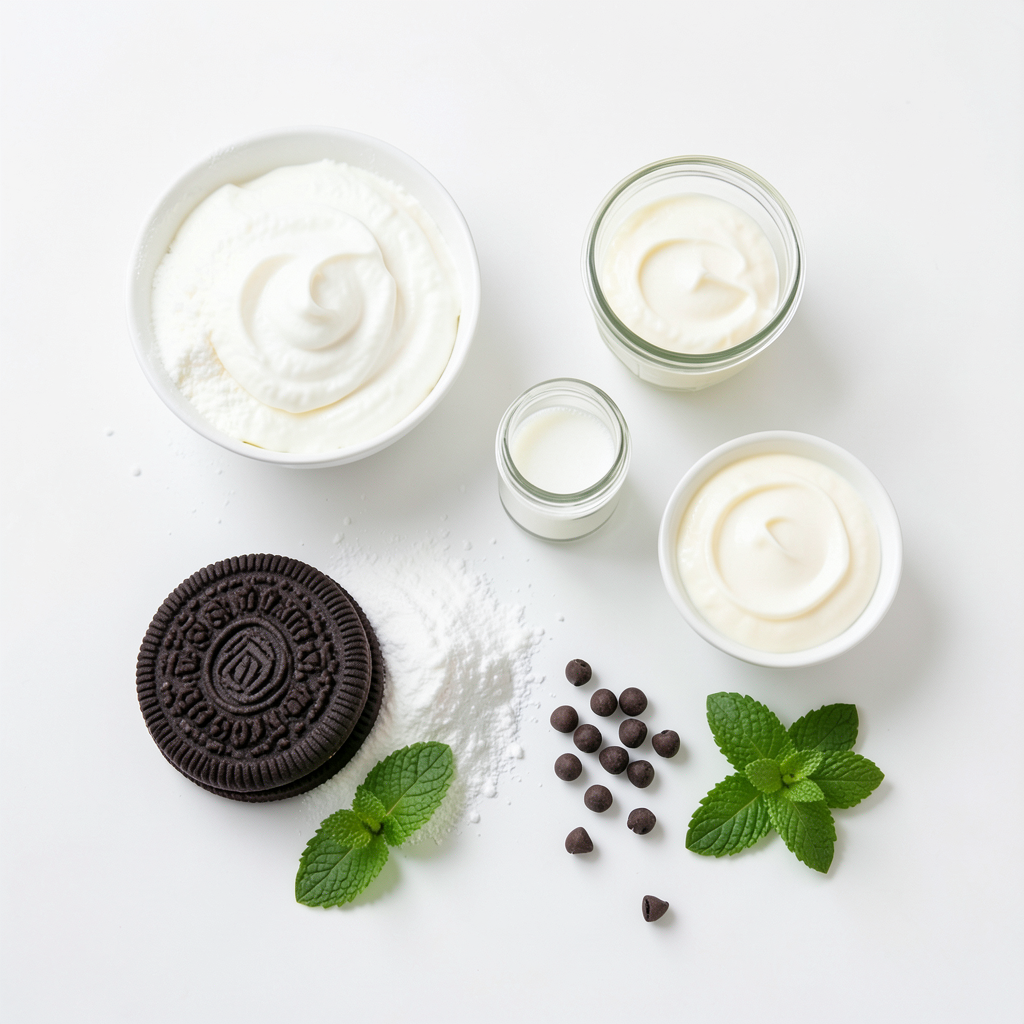
- 2 packs of Oreo cookies (about 36 cookies)
- 2 cups heavy cream
- 1 cup powdered sugar
- 1 teaspoon vanilla extract
- 8 oz cream cheese, softened
- 1 cup milk
These ingredients are key to the cake's creamy and rich flavor. The Oreo cookies add a crunchy texture, while the heavy cream and cream cheese create a smooth filling.
Optional Ingredients for Customization
You can add a bit of fun with these extras:
- 1 cup mini chocolate chips (optional)
- Fresh mint leaves for garnish (optional)
The mini chocolate chips add a sweet crunch, and mint leaves make a lovely garnish. You can even mix in some crushed Oreos for more flavor.
Tips for Choosing Quality Ingredients
Choosing high-quality ingredients makes a big difference. Here are some tips:
- Oreo Cookies: Use fresh cookies for the best taste.
- Heavy Cream: Look for cream with at least 36% fat for the best whipping.
- Cream Cheese: Choose a full-fat cream cheese for a rich texture.
- Powdered Sugar: Check that the sugar is fresh and clump-free.
Using fresh, quality ingredients will help make your cake taste even better. Enjoy every bite of this delicious dessert!
Step-by-Step Instructions
Whipping the Cream
To start, grab a large mixing bowl. Add 2 cups of heavy cream, 1 cup of powdered sugar, and 1 teaspoon of vanilla extract. Use an electric mixer to beat the mix on high speed. Keep mixing until medium peaks form, which takes about 2-3 minutes. Once done, set the whipped cream aside. This cream adds lightness and sweetness to the cake.
Preparing the Cream Cheese Mixture
Next, take another bowl and add 8 oz of softened cream cheese. Use a hand mixer or whisk to beat until it’s creamy and smooth. Gradually fold in the whipped cream you made earlier. Mix gently until they blend well. This mixture gives the cake a rich and creamy texture.
Dipping the Oreos
Pour 1 cup of milk into a shallow dish. Quickly dip each Oreo cookie into the milk for about 2-3 seconds. Be careful here; you want them soft but not mushy. If they soak too long, they may break apart. This step brings out the Oreo flavor and helps them soften for layering.
Layering the Icebox Cake
Now, grab a 9x13 inch baking dish. Start by arranging a single layer of the dipped Oreos at the bottom. Make sure to cover the entire surface. Next, use a spatula to spread a layer of the cream cheese mixture over the Oreos. Smooth it evenly. If you like, sprinkle some mini chocolate chips on this layer for added flavor and crunch.
Chilling Time and Final Touches
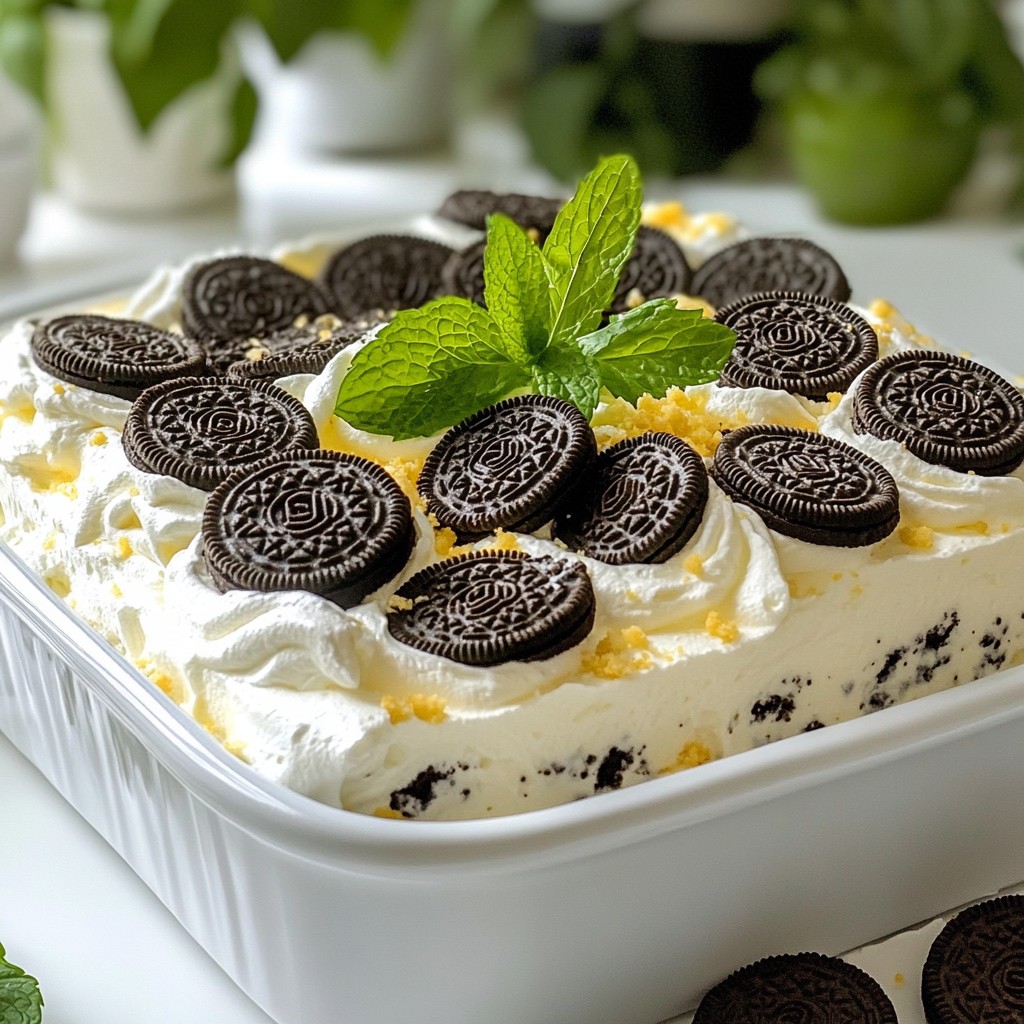
Continue the process of dipping Oreos and spreading the cream mixture. Alternate layers until you reach the top of the dish. Generally, 3-4 layers work best for balance. For the top layer, use any leftover cream mixture and smooth it out. You can also garnish this layer with crushed Oreos or whole cookies for decoration. Cover the baking dish with plastic wrap. Refrigerate for at least 4-6 hours, or overnight if possible. This chilling time allows the flavors to mix and the cookies to soften perfectly.
Tips & Tricks
Perfecting the Whipped Cream
To make the best whipped cream, start with cold heavy cream. Cold cream whips better and faster. Add powdered sugar and vanilla extract to the cream. Mixing these will help sweeten the cream and add flavor. Use an electric mixer and beat on high speed. Stop when you see medium peaks. This means the cream holds shape but is still soft. If you overwhip, it can turn into butter. So keep an eye on it!
How to Prevent Oreos from Falling Apart
Dipping Oreos in milk is key. Use a shallow dish for the milk. Dip each Oreo for just 2-3 seconds. You want the cookie soft but not mushy. If they break, they won’t layer well. Handle them gently when placing them in the dish. A firm but careful touch goes a long way. Layering them quickly will help keep their structure.
Creative Serving Suggestions
For a fun twist, serve your cake on a decorative platter. Add a drizzle of chocolate sauce for extra sweetness. You can also place a scoop of vanilla ice cream beside each slice. Fresh mint leaves on top add color and flavor. If you want to impress guests, garnish the top with crushed Oreos or whole cookies. These touches make your cake look and taste special!
Pro Tips
- Use Fresh Cream: For the best texture and flavor, make sure your heavy cream is fresh and well-chilled before whipping. This helps achieve stable peaks and a creamy consistency.
- Mind the Dipping: When soaking your Oreos in milk, dip them quickly to avoid getting them too soggy. A quick 2-3 seconds is sufficient for them to soften without falling apart.
- Layer Evenly: Ensure that each layer of cream is spread evenly over the Oreos to create a balanced texture throughout the cake. This helps each bite to have the perfect ratio of cookie to cream.
- Chill Overnight: For optimal flavor and texture, let your cake chill overnight. This allows the cookies to fully absorb the cream and results in a deliciously creamy dessert.
Variations
Different Flavor Options (e.g., Peanut Butter, Mint)
You can mix up this Oreo cake with new flavors. Try using peanut butter! Add half a cup of smooth peanut butter to the cream cheese mix. This gives a rich and nutty taste. If you love mint, swap in mint Oreos. You can also add a few drops of mint extract to the whipped cream. This makes a fresh and cool treat.
Gluten-Free Oreo Cookies Alternative
Want a gluten-free version? You can find gluten-free Oreos at many stores. They taste great and work well in this recipe. Just follow the same steps as normal. Your guests won’t even know the difference!
Adding Fresh Fruits or Berries
Fresh fruits can add a bright twist to your cake. Try layering in sliced strawberries or blueberries between the Oreo layers. You can also top the cake with fresh fruit for a fun look. This adds natural sweetness and a pop of color. It’s a great way to make your dessert feel lighter!
Storage Info
Best Practices for Storing Icebox Cake
To keep your Oreo Cookies and Cream Icebox Cake fresh, store it properly. Use an airtight container or cover it tightly with plastic wrap. This will help keep moisture in and prevent it from absorbing other smells from your fridge. If you want to serve it later, make sure it's chilled first.
How Long It Keeps in the Fridge
This delicious cake can last in the fridge for about 3 to 5 days. The longer it sits, the softer the Oreos will get, blending with the cream. Just check for any off smells or signs of spoilage before serving. If it looks or smells bad, it's best to toss it.
Freezing Tips for Longer Storage
If you want to save some cake for later, freezing is a great option. Slice the cake into pieces and wrap each piece in plastic wrap. Then, place the wrapped pieces in a freezer bag. This way, you can thaw just what you need. It can stay in the freezer for about 1 to 2 months. When you're ready to enjoy a piece, let it thaw in the fridge overnight for the best texture.
FAQs
Can I make this recipe ahead of time?
Yes, you can make this icebox cake ahead of time. It tastes even better after chilling overnight. This allows the flavors to mix well. You can prepare it a day or two in advance. Just remember to cover it well in the fridge to keep it fresh.
What can I substitute for heavy cream?
If you don’t have heavy cream, you can use coconut cream. It gives a nice taste and texture. Another option is to use half-and-half mixed with butter. This mix can mimic heavy cream in recipes. Just whisk it well to make it smooth.
How can I make a smaller batch of this icebox cake?
To make a smaller batch, reduce the ingredients by half. Use one pack of Oreo cookies. Cut the heavy cream to one cup. Also, use four ounces of cream cheese. You can still layer it in a smaller dish. Just follow the same steps for a delightful treat!
We've covered how to make an Oreo Cookies and Cream Icebox Cake in easy steps. You learned about key ingredients, tips for the best results, and cool ways to mix it up. Remember to choose quality ingredients for the best taste. This dessert is fun to make and share. You can even add your twist with flavors or fruits. Enjoy your delicious creation, and don't forget to store it right! Make this cake, and impress your friends and family with every bite.