If you love bright, tangy desserts, I have a treat for you! My delicious air fryer lemon curd tartlets are easy to make and full of flavor. You need simple ingredients like all-purpose flour, lemon curd, and fresh zest. With just a few steps, you can enjoy a sweet and zesty bite that's perfect for any occasion. Ready to impress your friends and family? Let’s dive into this quick recipe!
Why I Love This Recipe
- Bright Citrus Flavor: The tangy lemon curd provides a refreshing burst of flavor that balances perfectly with the buttery tart crust.
- Easy to Make: With simple ingredients and straightforward steps, these tartlets are a breeze to whip up, even for novice bakers.
- Perfect for Any Occasion: Whether it’s a casual get-together or a fancy dinner party, these tartlets are sure to impress your guests.
- Garnish Options: The fresh mint and lemon zest add a beautiful touch that elevates the presentation and flavor of the dessert.
Ingredients
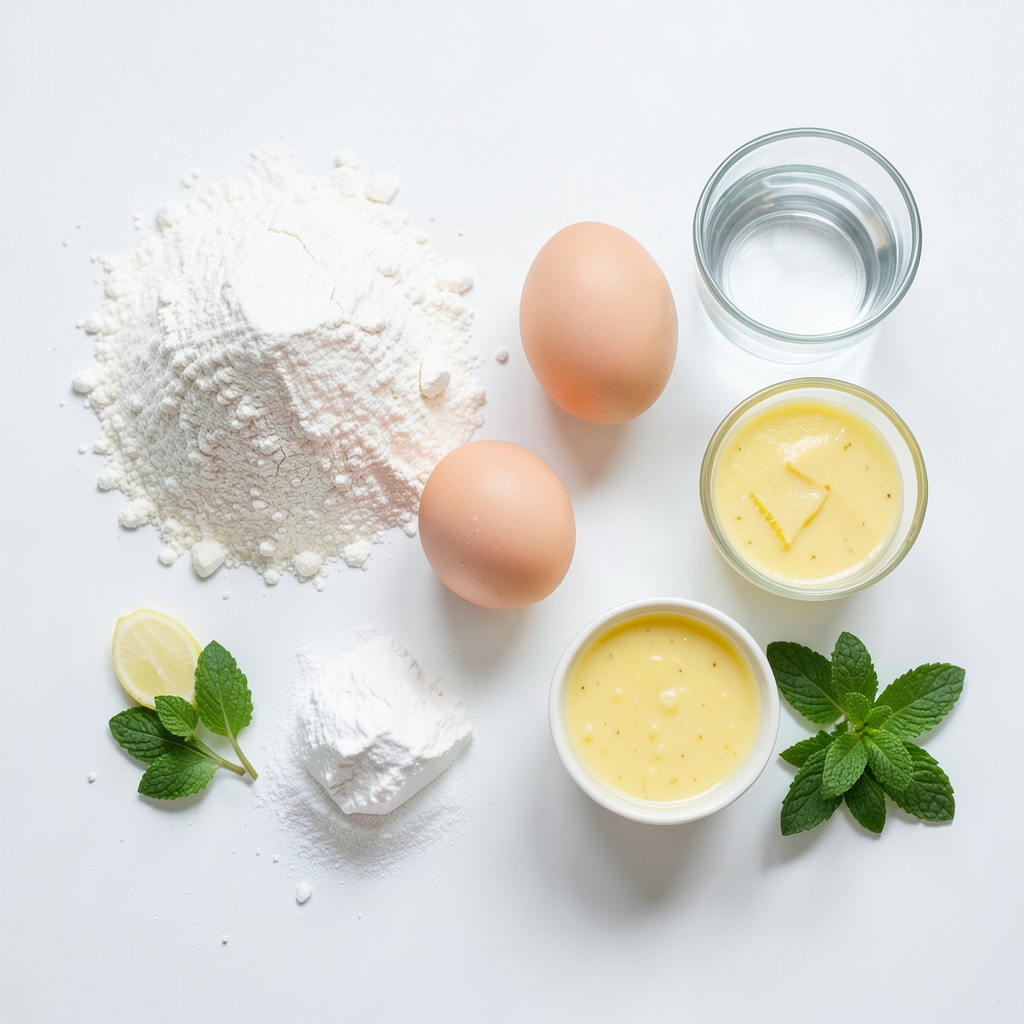
List of Ingredients
- 1 cup all-purpose flour
- 1/4 cup powdered sugar
- 1/2 teaspoon salt
- 1/2 cup unsalted butter, softened at room temperature
- 1 large egg yolk
- 1 tablespoon cold water
- 1 cup homemade or store-bought lemon curd
- Zest of 1 lemon, for garnish
- A handful of fresh mint leaves, for garnish
Every ingredient in these tartlets plays a vital role. The all-purpose flour serves as the base for our tartlet shells. Powdered sugar adds sweetness and helps create a tender crust. Salt balances the flavors, while unsalted butter gives richness and a flaky texture.
The egg yolk binds the dough, making it smooth and pliable. A little cold water helps bring everything together. The star of this recipe is definitely the lemon curd, which gives that bright, zesty flavor. Fresh lemon zest enhances the tartness and aroma, while fresh mint leaves add a lovely touch for garnish.
Using quality ingredients makes a big difference. Choose fresh lemons for zest and curd. If you can, make your own lemon curd. It’s simple and tastes amazing!
Step-by-Step Instructions
Preparing the Tartlet Dough
1. Start by mixing the dry ingredients. In a big bowl, combine 1 cup of all-purpose flour, 1/4 cup of powdered sugar, and 1/2 teaspoon of salt. Whisk them well until they blend smoothly.
2. Next, incorporate the butter and egg yolk. Add 1/2 cup of softened unsalted butter and 1 large egg yolk into the dry mix. Use a fork or your fingers to blend. Keep mixing until it forms a crumbly dough.
3. Now, it’s time to form the dough. Gradually add 1 tablespoon of cold water, mixing until you create a smooth, cohesive dough. Shape it into a flat disk.
Chilling and Shaping the Dough
1. Chill the dough for about 30 minutes. Wrap it tightly in plastic wrap and place it in the fridge. This helps the dough firm up.
2. After chilling, roll out the dough. On a lightly floured surface, roll it to about 1/4 inch thick.
3. Cut and press the dough into molds. Use a round cutter to make circles slightly bigger than your mini tartlet molds. Gently press the dough into the molds and trim any excess.
Cooking the Tartlets
1. Preheat your air fryer to 320°F (160°C). Once hot, arrange the tartlet shells in the basket without them touching.
2. Air fry for 8-10 minutes. Watch for a lovely golden brown color.
3. After cooking, cool down the tartlet shells in the molds. Remove them carefully once they are completely cool.
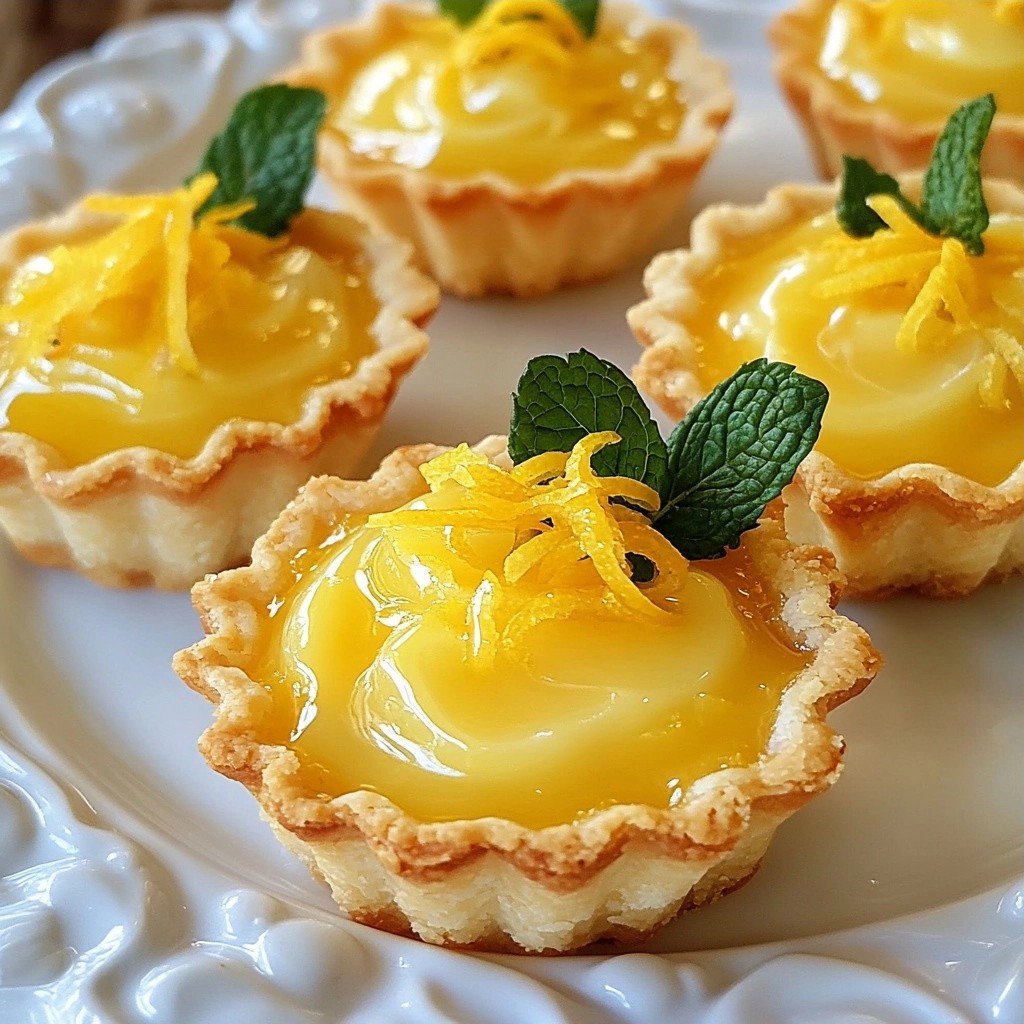
4. Finally, fill each tartlet with lemon curd. Spoon in the lemon curd until it reaches the top. This creates a burst of flavor with every bite!
Tips & Tricks
Perfecting the Tartlet Shells
To avoid soggy bottoms, make sure to bake the shells until they are golden brown. This gives them a nice crunch. Also, preheating your air fryer is key. It helps cook them evenly.
You can also pierce the bottom of the dough with a fork. This allows steam to escape, preventing sogginess. I recommend checking the tartlets around the 8-minute mark. If they need more time, air fry them for another minute.
Presentation Tips
Garnishing with lemon zest adds a fresh look. Just sprinkle it on top before serving. This brightens up the tartlets and gives a pop of color.
For creative serving suggestions, arrange the tartlets on a platter. You can drizzle raspberry sauce around them. This adds color and sweet contrast to the tart lemon flavor.
Helpful Cooking Tools
For this recipe, use non-stick tartlet molds. They help the shells come out easily without breaking.
A good set of measuring cups and spoons is also helpful. This keeps your ingredients accurate. A rolling pin helps you roll out the dough evenly. Having these tools makes the process smooth and fun.
Pro Tips
- Chill the Dough: Make sure to chill the dough for at least 30 minutes. This helps to prevent shrinkage during baking and results in a more tender crust.
- Use Fresh Ingredients: For the best flavor, use fresh lemons for zesting and making lemon curd. Fresh ingredients elevate the taste of your tartlets significantly.
- Air Fryer Timing: Keep an eye on the tartlet shells while they air fry, as air fryer models can vary. Adjust the cooking time slightly if needed to achieve a perfect golden brown color.
- Garnishing Tips: When garnishing, consider adding a light dusting of powdered sugar on top for an elegant finish that complements the tartness of the lemon curd.
Variations
Flavor Enhancements
You can change the taste of your tartlets by using different citrus curds. Lime and orange curds add a fun twist. Each brings its own unique flavor. Mix and match to find your favorite! You can also add herbs or spices. A touch of basil or ginger can elevate the taste. Experimenting with flavors keeps things exciting!
Alternative Garnishes
Garnishes make your tartlets pop! Fresh fruits like berries or kiwi add color and flavor. They also make your dessert look fancy. Sugared herbs are another fun option. Just dip mint or basil leaves in sugar for a sweet touch. These garnishes not only taste great but also look beautiful on your plate!
Dough Variations
If you need a gluten-free option, use almond flour or a gluten-free blend. These will still give you a nice crust. You can also save time by using a store-bought crust. This is a great shortcut for busy days. Just make sure it fits your tartlet molds well. Both options make it easy to enjoy these tasty treats!
Storage Info
Storing Unfilled Tartlet Shells
Store your unfilled tartlet shells at room temperature. Keep them in an airtight container. They will stay fresh for about two days. If you want to keep them longer, refrigerate them. In the fridge, they can last up to a week. Make sure to wrap them well. This prevents them from drying out.
Storing Filled Tartlets
To keep filled tartlets fresh, place them in the fridge. Use a container that seals tightly. They can stay fresh for about three days. The lemon curd can make the shells soggy if left too long. To avoid this, fill the shells just before serving. This keeps the shells crisp and delicious.
Freezing Options
You can freeze tartlet shells and lemon curd separately. To freeze shells, wrap them in plastic and place them in a freezer bag. They can last up to three months. For the lemon curd, store it in an airtight container. You can freeze it for up to six months. When ready to use, thaw in the fridge overnight. This makes it easy to enjoy your tartlets whenever you want!
FAQs
How can I make my own lemon curd?
You can make lemon curd with simple ingredients. Start with fresh lemons, sugar, eggs, and butter. Juice and zest the lemons. In a pot, mix the juice, zest, sugar, and eggs. Cook on low heat, stirring constantly, until it thickens. Once thickened, stir in butter until smooth. Let it cool, and you have fresh lemon curd ready for your tartlets.
Can I use a pre-made tart crust instead?
Yes, you can use a pre-made tart crust. This saves time and effort. Just ensure it fits your tartlet molds. Follow the package instructions for baking times. Fill with lemon curd after baking. This option works well for quick desserts.
What’s the best way to ensure my pastry is flaky?
To keep your pastry flaky, handle the dough gently. Use cold butter and water. Avoid over-mixing the dough. Chill the dough before rolling it out. This helps the layers stay distinct and flaky when baked. Also, air frying at the right temperature helps achieve that perfect texture.
Can I make these tartlets in advance?
Yes, you can prepare the tartlet shells ahead of time. Bake them, let them cool, and store them in an airtight container. Fill them with lemon curd right before serving. This keeps the shells crisp and fresh.
What can I use instead of lemon curd?
You can use other fruit curds like lime or orange. You can also try chocolate ganache or pastry cream. Each option brings a unique twist to the tartlets. Experiment with flavors to find your favorite combination.
How do I decorate my tartlets?
Decorate your tartlets with fresh fruits or whipped cream. You can also sprinkle powdered sugar on top. For a fresh touch, add mint leaves or edible flowers. These details make your tartlets look even more appealing.
How do I store leftover tartlets?
Store any leftover filled tartlets in the fridge. Use a covered container to keep them fresh. They are best eaten within a few days. If you have unfilled shells, keep them in a cool, dry place.
In this blog post, we explored how to make tasty tartlets. We covered ingredients like flour, butter, and lemon curd. You learned step-by-step how to prepare, chill, and fill your tartlet shells. Our tips helped you avoid soggy crusts and suggested creative garnishes. We also shared flavor variations, storage tips, and FAQs to guide you.
These tartlets are not just easy to make; they are fun and delicious. Enjoy your baking adventures and share your creations!