
Are you ready to enjoy a healthy twist on a classic favorite? My Crunchy Air-Fried Cauliflower Buffalo Wings are a hit whether you're vegan, gluten-free, or just craving something tasty. This recipe is easy to follow, and you'll have crispy, spicy wings in no time. Let's dive into the ingredients and get cooking! Your new favorite snack awaits!
Why I Love This Recipe
- Healthier Alternative: These air-fried cauliflower wings provide a guilt-free option for enjoying classic buffalo flavors without the excess calories from frying.
- Easy to Make: With simple ingredients and quick preparation, this recipe is perfect for busy weeknights or last-minute gatherings.
- Customizable Spice Level: You can easily adjust the heat by using more or less buffalo sauce, making it suitable for everyone’s taste.
- Perfect Finger Food: These cauliflower wings are ideal for parties, game days, or casual get-togethers, making them a hit with family and friends.
Ingredients
List of Ingredients
- Cauliflower
- All-purpose flour or gluten-free flour
- Plant-based milk or regular milk
- Garlic powder
- Onion powder
- Smoked paprika
- Salt and black pepper
- Buffalo sauce
- Olive oil
- Fresh parsley
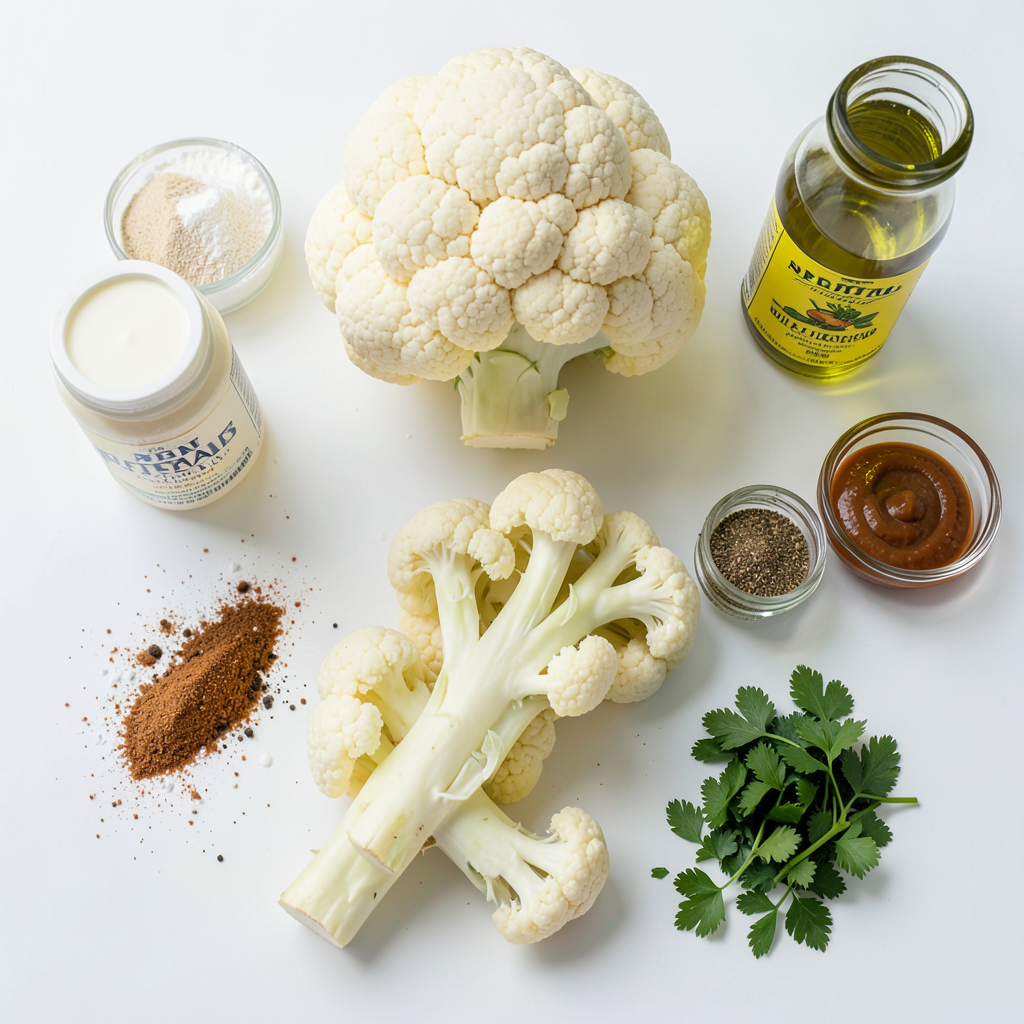
To make crunchy air-fried cauliflower buffalo wings, you need simple ingredients. Start with one large head of cauliflower. Cut it into bite-sized florets. This will give you the perfect shape for dipping and frying.
Next, you will need flour. You can choose all-purpose flour or gluten-free flour. Both work well in the batter. You also need one cup of plant-based milk. If you prefer, you can use regular milk instead. This adds moisture to your batter.
Now, let’s spice it up! You need garlic powder, onion powder, and smoked paprika. Each spice adds unique flavors to the wings. Don’t forget salt and black pepper for taste.
For the sauce, use one cup of buffalo sauce. You can buy it or make your own. It gives the wings their signature kick.
To make them crispier, drizzle two tablespoons of olive oil over the coated cauliflower. This helps achieve that nice crunch we all love. Lastly, fresh parsley adds a pop of color and freshness when you serve your wings.
Step-by-Step Instructions
Preheating the Air Fryer
Start by preheating your air fryer to 375°F (190°C). This helps the cauliflower wings cook evenly. Let it heat up while you prepare the batter.
Preparing the Batter
In a large mixing bowl, combine 1 cup of all-purpose flour with 1 teaspoon of garlic powder, 1 teaspoon of onion powder, and 1 teaspoon of smoked paprika. Add salt and black pepper to taste. Mix well. Slowly pour in 1 cup of plant-based milk. Stir until you have a smooth batter without lumps.
Coating the Cauliflower
Take your large cauliflower head and cut it into bite-sized florets. Dip each floret into the batter. Make sure each piece is well-coated. Shake off any extra batter. Place the coated florets in a single layer in your air fryer basket.
Air Frying the Cauliflower Wings
Drizzle the coated florets with 2 tablespoons of olive oil for extra crunch. Air fry them for 15 to 20 minutes. Shake the basket halfway through to ensure they cook evenly. They should turn golden and crispy.
Tossing in Buffalo Sauce
Once cooked, transfer the cauliflower wings to a bowl. Pour 1 cup of buffalo sauce over them and toss gently. Make sure all the wings are evenly coated. Return the wings to the air fryer for another 5 minutes to set the sauce. After that, let them cool for a few minutes before serving.
Tips & Tricks
Achieving the Perfect Crispiness
To get the best crunch, start with dry cauliflower. Pat the florets with a clean towel. This step removes excess moisture. It helps the batter stick better. Use a light drizzle of olive oil before air frying. This adds richness and aids in crisping. Don’t overcrowd the basket. Give each floret room to breathe. Shake the basket halfway through cooking for even crispiness.
Flavor Variations for the Batter
You can change up the batter for fun flavors. Add some cayenne pepper for heat. Try a bit of nutritional yeast for a cheesy taste. For a tangy twist, mix in a tablespoon of lemon juice. You can also swap out garlic powder for a bit of curry powder. Each variation brings a new taste to your wings.
Serving Suggestions
When ready to serve, make it fun! Arrange the wings on a colorful platter. Garnish with chopped parsley for a fresh look. Pair them with crunchy celery sticks. Serve with a side of ranch or blue cheese dressing for dipping. These wings work great for parties or game day. Enjoy them with friends and family!
Pro Tips
- Coating Consistency: Make sure the batter is smooth and not too thick; this will ensure an even coating on the cauliflower and a better texture after frying.
- Air Fryer Capacity: Avoid overcrowding the air fryer basket. Fry in batches if necessary to ensure that each wing gets crispy and evenly cooked.
- Buffalo Sauce Variety: Experiment with different buffalo sauce brands or even homemade versions to find your perfect level of heat and flavor.
- Serving Suggestions: Pair your wings with fresh veggies and a creamy dipping sauce to balance the spice and enhance the overall experience.
Variations
Gluten-Free Version
You can make these wings gluten-free. Just swap the all-purpose flour with gluten-free flour. It works well and keeps the texture. Make sure to check labels for any hidden gluten.
Vegan Options
If you want a vegan version, use plant-based milk instead of regular milk. This keeps the recipe dairy-free. The rest of the ingredients are already vegan-friendly, so you're good to go!
Spicy vs. Mild Buffalo Sauce
You can choose your heat level with the buffalo sauce. For a spicy kick, pick a hotter sauce or add cayenne pepper. If you prefer mild, look for a sauce labeled as "mild." This way, everyone can enjoy these tasty wings!
Storage Info
How to Store Leftovers
To keep your leftover cauliflower wings fresh, place them in an airtight container. Make sure they cool completely before sealing. Store them in the fridge for up to 3 days. This helps maintain their flavor and texture.
Reheating Instructions
When you’re ready to enjoy leftovers, preheat your air fryer to 350°F (175°C). Place the cauliflower wings in a single layer in the basket. Air fry them for about 5 to 7 minutes. This will help make them crispy again. You can also use a conventional oven at 375°F (190°C) for about 10 minutes.
Freezing Cauliflower Wings
If you want to freeze your cauliflower wings, first let them cool completely. Spread them out on a baking sheet lined with parchment paper. Freeze them for about 2 hours until firm. Then transfer them to a freezer-safe bag. They can last in the freezer for up to 3 months. To cook frozen wings, air fry them at 375°F (190°C) for 15 to 20 minutes, adding a few extra minutes if needed.
FAQs
Can I use frozen cauliflower florets?
Yes, you can use frozen cauliflower florets. Just thaw them first. This helps the batter stick better. Pat them dry with a towel to remove excess moisture. This will keep them crunchy.
How can I make them spicier?
To make your wings spicier, add more buffalo sauce. You can also mix in cayenne pepper or hot sauce to the batter. Another idea is to use a spicier buffalo sauce. Taste and adjust until it’s just right for you.
What can I serve with Cauliflower Buffalo Wings?
Serve these wings with crunchy celery sticks or carrot sticks. They pair well with ranch or blue cheese dressing. You can also add a fresh salad for a complete meal. Get creative with sides that you love!
How long do leftovers last?
Leftovers last for about 3 to 4 days in the fridge. Store them in an airtight container. Reheating them in the air fryer keeps them crispy. Just warm them at 350°F for a few minutes.
Can I bake these instead of air-frying?
Yes, you can bake them! Set your oven to 425°F. Spread the coated cauliflower on a baking sheet. Bake for about 25 to 30 minutes. Remember to flip them halfway for even cooking.
You learned how to make tasty cauliflower Buffalo wings with easy steps. We covered ingredients and instructions, plus tips for crispiness. You can adapt the recipe for gluten-free or vegan options. Remember to store leftovers properly to keep them fresh. With this guide, you can enjoy a fun, healthier snack that pleases everyone. Experiment with flavors and have fun in the kitchen!