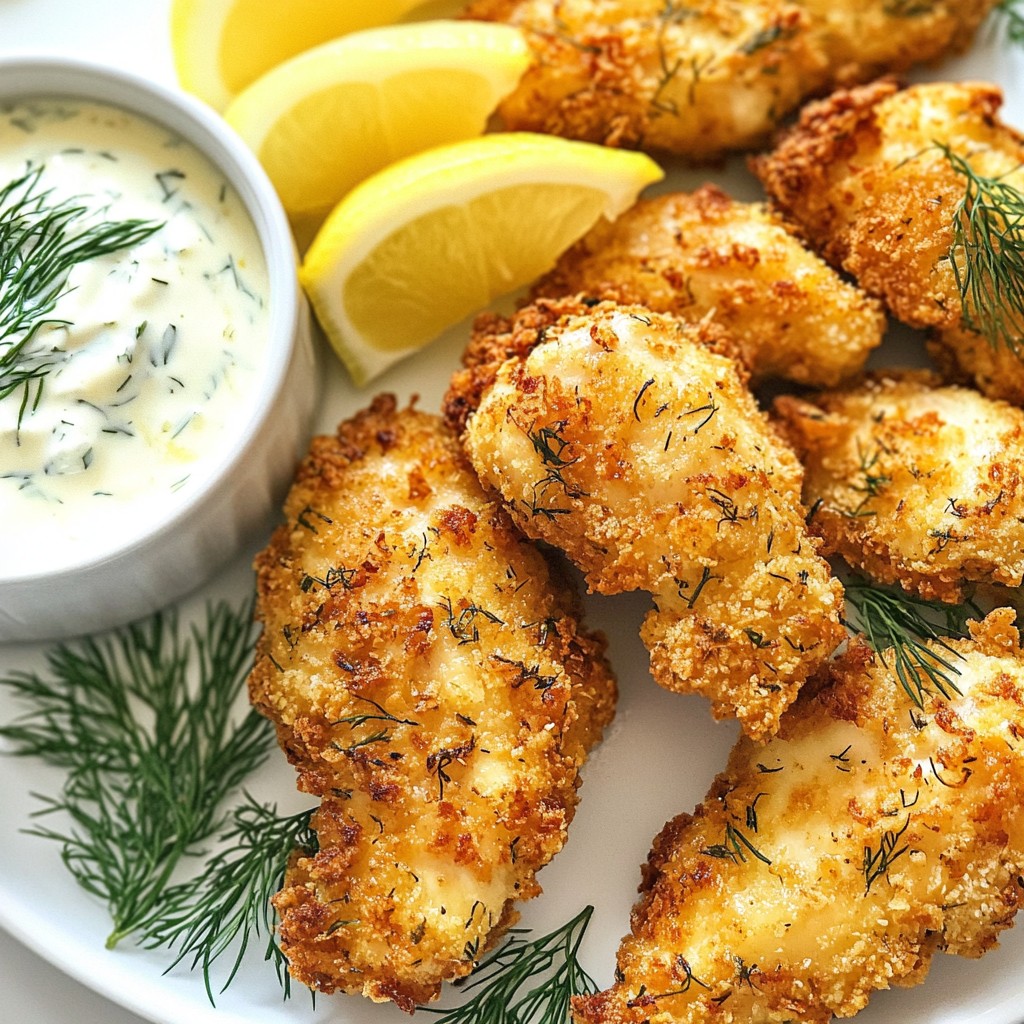
Looking for a tasty meal that’s both crispy and bursting with flavor? Try my Crispy Air Fryer Lemon Dill Chicken Tenders! Juicy chicken and fresh lemon combined with dill create a mouthwatering dish the whole family will love. With just a few simple steps, you’ll have a delicious dinner on the table in no time. Let’s dive into this easy recipe that will make your taste buds dance!
Why I Love This Recipe
- Delicious Flavor Combination: The combination of lemon and dill brings a refreshing and vibrant flavor to the chicken tenders, making them perfect for any meal.
- Healthier Cooking Method: Using an air fryer allows for crispy chicken tenders without the extra oil, making this a lighter option compared to traditional frying.
- Easy to Prepare: With minimal prep time and simple ingredients, this recipe is perfect for busy weeknights or entertaining guests.
- Customizable: You can easily adjust the seasoning or add your favorite spices to the marinade for a personalized touch.
Ingredients
Main Ingredients
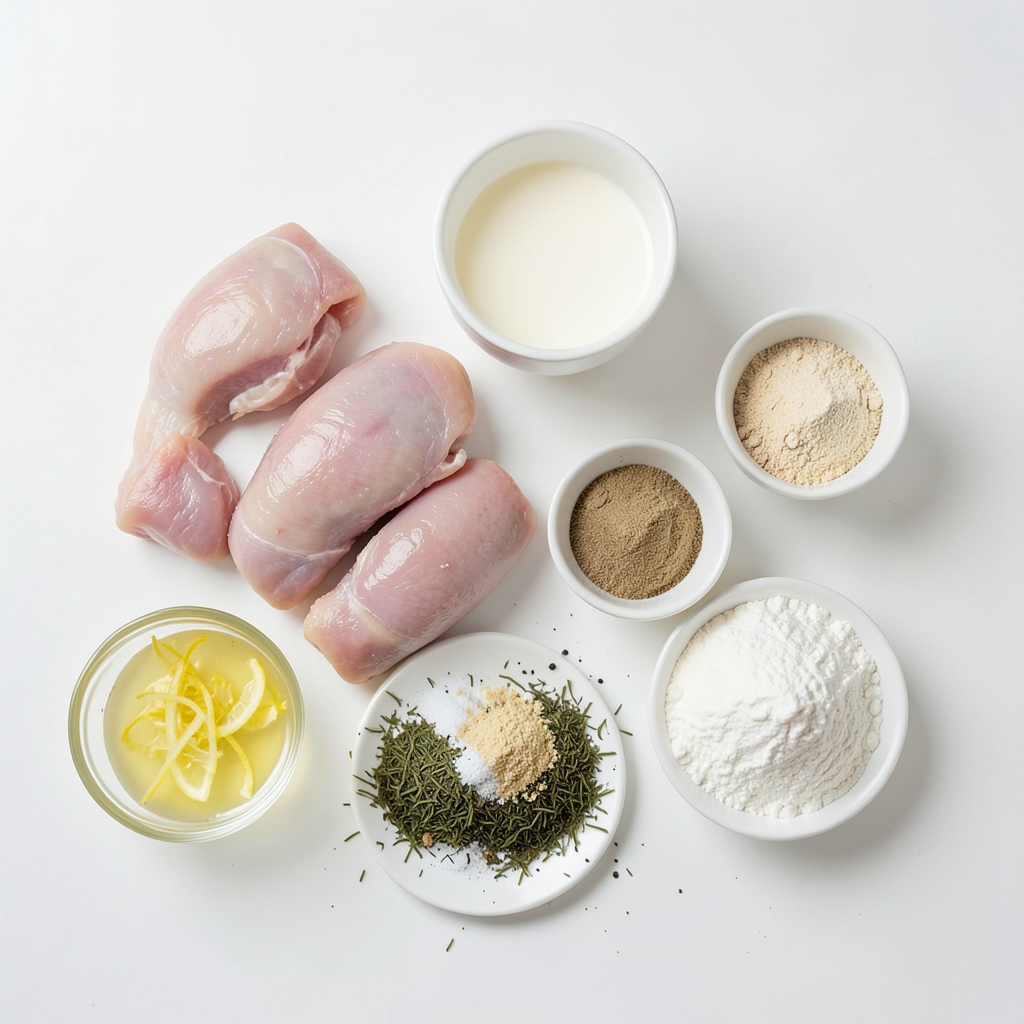
- 1 lb chicken tenderloins
- 1 cup buttermilk
- 1 tablespoon fresh lemon juice
- Zest of 1 lemon
- 1 teaspoon dried dill weed
- 1 teaspoon garlic powder
- 1 teaspoon onion powder
- Salt and pepper, to taste
For the main ingredients, I love using chicken tenderloins. They are juicy and cook quickly. The buttermilk makes the chicken very tender. Lemon juice adds a bright flavor. The zest gives a nice kick. Dill, garlic powder, and onion powder round out the taste. Don't forget the salt and pepper for seasoning.
Breading Components
- 1 cup panko breadcrumbs
- ½ cup all-purpose flour
For the breading, panko breadcrumbs are key. They give a great crunch. I mix them with all-purpose flour. The flour helps the breadcrumbs stick well to the chicken.
Suggested Dipping Sauces
- Creamy dill dressing
- Honey mustard sauce
For dipping, I suggest a creamy dill dressing. It pairs well with the lemon flavor. Honey mustard sauce is another great option. It adds a sweet and tangy taste. Both sauces enhance the chicken tenders and make them more fun to eat.
Step-by-Step Instructions
Marinating the Chicken
Preparing the Marinade First, grab a large mixing bowl. Whisk together these ingredients:
- 1 cup buttermilk
- 1 tablespoon fresh lemon juice
- Zest of 1 lemon
- 1 teaspoon dried dill weed
- 1 teaspoon garlic powder
- 1 teaspoon onion powder
- Salt and pepper, to taste
Mix well to ensure everything blends nicely. The marinade gives the chicken a tasty flavor.
Duration of Marination Now, add the chicken tenderloins into the marinade. Make sure each piece is well-coated. Cover the bowl with plastic wrap or a lid. Let it sit in the fridge for at least 30 minutes. For more flavor, you can marinate it for up to 2 hours.
Setting Up the Breading Station
Arranging the Ingredients While the chicken marinates, set up your breading station. Take three shallow bowls and fill them as follows:
- One with all-purpose flour
- One with 1 cup panko breadcrumbs
- The last one should stay empty for easy chicken handling
This setup makes the breading process smooth.
Process for Coating the Chicken After marinating, take each chicken tender from the buttermilk mixture. Let any extra marinade drip off. First, coat the tender in flour, shaking off the excess. Then, dip it into the panko breadcrumbs. Press lightly to ensure a nice coating.
Air Frying the Chicken Tenders
Preheating the Air Fryer Before you start cooking, preheat your air fryer to 400°F (200°C). This step is key for crispy chicken.
Cooking Time and Temperature Place the breaded chicken tenders in the air fryer basket in a single layer. Don’t overcrowd them; they need space to cook evenly. Lightly spray or brush olive oil on top to help with crispiness. Cook for 10-12 minutes, flipping halfway through for even browning.
Checking for Doneness Check that the chicken reaches an internal temperature of 165°F (75°C). When ready, the tenders should look golden brown. After cooking, let them rest for a couple of minutes. This keeps them juicy and delicious.
Tips & Tricks
Achieving Maximum Crispiness
- Importance of Panko Breadcrumbs: Panko breadcrumbs make a big difference. They are lighter and crunchier than regular breadcrumbs. This gives your chicken tenders a great crunch. Be sure to use panko for the best texture.
- Using Olive Oil Spray: Spraying the chicken with olive oil is key. It helps the breadcrumbs crisp up nicely. A light coat keeps the flavor without making it greasy. Use a spray bottle for even coverage.
Flavor Enhancements
- Variations in Seasoning: You can change the flavor by adding herbs. Try adding thyme or parsley for a fresh twist. A little paprika can also add some kick. Play with spices to match your taste.
- Suggested Marinade Tips: Don’t rush the marination. Let your chicken sit in the buttermilk mix for at least 30 minutes. For even better flavor, let it sit for up to 2 hours. This allows the chicken to soak up all those yummy flavors.
Presentation Tips
- Plating Ideas: Make your dish look great. Place the crispy chicken tenders on a wooden board. This rustic look is inviting. You can also use a bright white plate to make the colors pop.
- Garnishing with Lemon and Dill: For a finishing touch, add lemon wedges and fresh dill. This not only adds color but also enhances the flavor. A sprig of dill on top looks fancy and fresh, making your dish stand out.
Pro Tips
- Marinating Time: For the best flavor, marinate the chicken for at least 2 hours. This allows the buttermilk and seasonings to fully penetrate the meat.
- Perfectly Crispy Coating: Make sure to press the panko breadcrumbs firmly onto the chicken to ensure a thick and crispy crust once cooked.
- Check for Doneness: Always use a meat thermometer to check that the chicken tenders have reached an internal temperature of 165°F (75°C) for safe consumption.
- Resting Period: Let the chicken tenders rest for a few minutes after air frying. This helps to lock in the juices and keep the meat tender.
Variations
Flavor Variations
You can twist this recipe to fit your taste. Want some heat? Try the spicy lemon dill option. Simply add red pepper flakes or hot sauce to the marinade. This adds a kick and balances the bright lemon and fresh dill.
For a different flavor, consider herb-infused alternatives. You can swap dill for thyme or parsley. Both herbs work well with lemon and chicken. They create a fresh and earthy taste that is equally delicious.
Dietary Modifications
If you need gluten-free options, it’s easy. Use almond flour or a gluten-free flour blend instead of the all-purpose flour. Make sure your panko is gluten-free too. This keeps the dish crunchy without gluten.
You can also substitute chicken with alternative proteins. Try using turkey tenderloins or tofu for a plant-based option. Both will absorb the marinade well and taste great with the lemon and dill flavor.
Cooking Method Alternatives
Not in the mood for air frying? You can oven-bake the lemon dill chicken tenders. Preheat your oven to 425°F (220°C). Arrange the breaded tenders on a baking sheet lined with parchment paper. Bake them for 15-20 minutes, flipping halfway, until golden and cooked through.
For a pan-fried version, heat oil in a skillet over medium heat. Cook the chicken tenders for about 5-7 minutes on each side. This will give them a crispy crust and juicy inside. Remember to keep an eye on them to avoid burning.
Storage Information
Storing Leftovers
After enjoying your crispy air fryer lemon dill chicken tenders, store any leftovers properly.
- Refrigeration Guidelines: Place the chicken tenders in the fridge within two hours of cooking. This keeps them safe to eat.
- Airtight Containers: Use airtight containers to keep the tenders fresh. This prevents moisture loss and keeps them tasty.
Freezing Instructions
If you want to save your chicken tenders for later, freezing is a great option.
- Proper Freezing Techniques: Let the chicken tenders cool completely. Then, place them in freezer-safe bags. Squeeze out as much air as possible before sealing.
- Reheating Tips: When ready to eat, thaw in the fridge overnight. Reheat in the air fryer for about 5-7 minutes at 350°F (175°C) to regain their crispiness.
Shelf Life
Knowing how long your chicken tenders last is important for food safety.
- Duration of Freshness in the Fridge: The chicken tenders will stay fresh in the fridge for up to 3 days.
- Signs of Spoilage: Always check for off smells or changes in color. If they seem slimy or have an unusual odor, it’s best to toss them.
FAQs
How do I know when the chicken tenders are done?
To check if your chicken tenders are done, use a meat thermometer. The internal temperature should reach 165°F (75°C). This is the safe temperature for chicken. When the tenders reach this temperature, they are juicy and safe to eat. You can also cut one tender in the thickest part. If the meat is white and the juices run clear, it is ready.
Can I use frozen chicken tenders?
Yes, you can use frozen chicken tenders. Cooking from frozen is easy, but you will need to adjust the cooking time. Increase the air frying time to about 15-18 minutes. Check the internal temperature to ensure it reaches 165°F (75°C). If you choose this method, avoid thawing the chicken first. This keeps the tenders juicy and flavorful.
What can I serve with crispy lemon dill chicken tenders?
Crispy lemon dill chicken tenders pair well with many side dishes. Here are some tasty options:
- Fresh salad with mixed greens and vinaigrette
- Steamed broccoli or green beans
- Crispy potato wedges or fries
- Rice pilaf or quinoa
- Coleslaw for a crunchy side
These sides complement the zesty flavor of the chicken. You can mix and match based on your mood or season. Enjoy your meal!
We explored all the key elements to make delicious lemon dill chicken tenders. We covered the important ingredients, from the tenderloins to the perfect spices. I shared step-by-step instructions, plus tips for great flavor and texture. You learned how to store leftovers and the best ways to enjoy variations of this dish.
Remember, with these guidelines, you can make tasty chicken tenders every time. Enjoy cooking and sharing these delightful bites!