If you love a sweet treat that’s also super easy to make, you’re in for a treat! Chocolate Mint Oreo Truffles combine creamy goodness and a minty twist with no baking required. This simple no-bake recipe is perfect for parties or cozy nights at home. Follow me on this fun journey to create delightful truffles that everyone will love. Get ready to satisfy your sweet tooth with these tasty bites!
Why I Love This Recipe
- Easy to Make: This recipe requires minimal ingredients and simple steps, making it perfect for both beginners and experienced bakers.
- Decadent Flavor: The combination of mint and chocolate creates a rich and refreshing taste that’s hard to resist.
- Perfect for Any Occasion: These truffles are great for parties, holidays, or just a special treat for yourself!
- Customizable: Feel free to experiment with different toppings or flavors to make these truffles your own.
Ingredients
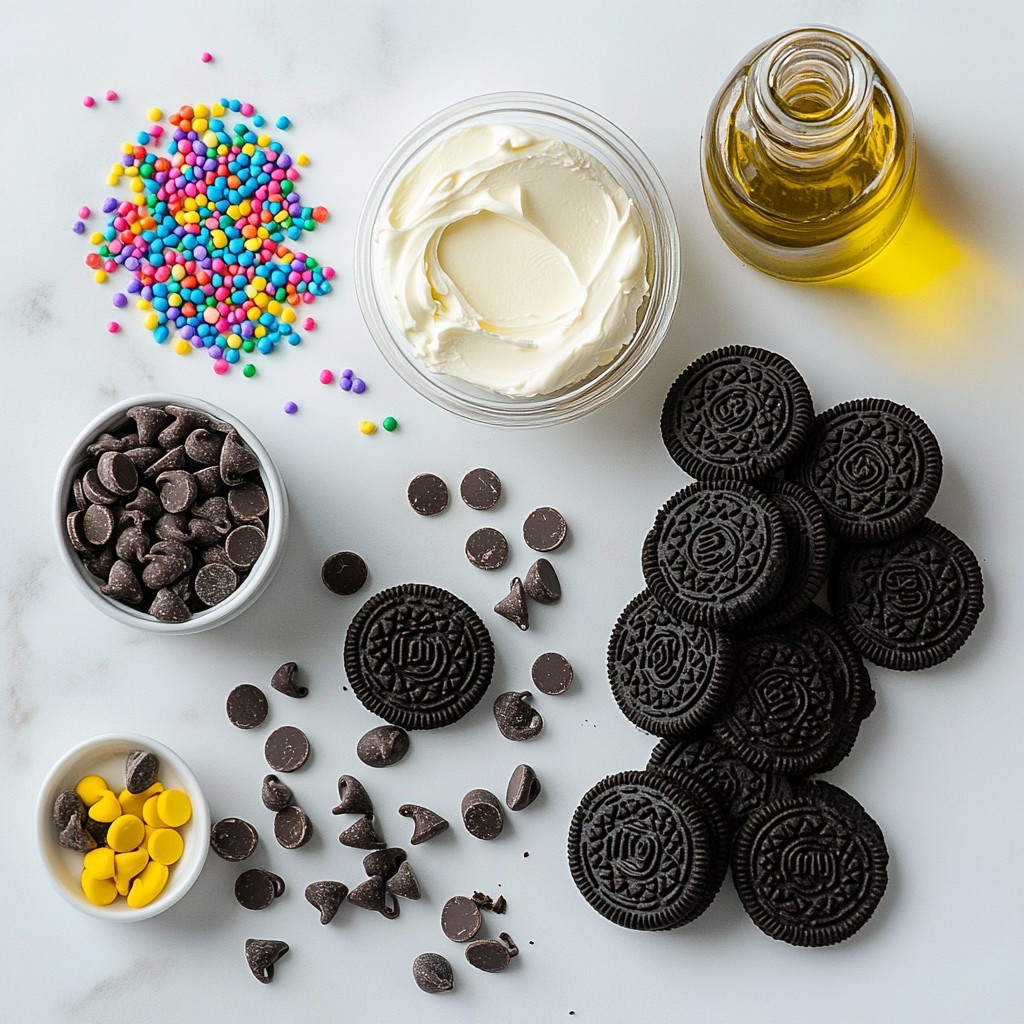
List of Ingredients
- 15.25 oz Oreo cookies
- 8 oz cream cheese
- 1 cup mint chocolate chips
- 1 cup semi-sweet chocolate chips
- 1 tablespoon vegetable oil
- ¼ teaspoon peppermint extract
- Optional toppings: crushed Oreos or chocolate sprinkles
To make Chocolate Mint Oreo Truffles, you need a few simple items. First, grab a pack of Oreo cookies. You will also need cream cheese, which should be soft. Mint chocolate chips will add a nice touch. For the outer layer, semi-sweet chocolate chips work best. Adding vegetable oil helps the chocolate melt smoothly. You can also use peppermint extract for extra minty flavor. Lastly, crushed Oreos or chocolate sprinkles make great toppings.
Understanding these ingredients is key. The cream cheese binds the Oreo crumbs, creating a rich filling. The mint chocolate chips give a fresh taste, while semi-sweet chocolate creates a delicious shell. Choose good quality chocolate for a better flavor.
Remember, these ingredients are easy to find. You might already have some at home. So, let’s gather our supplies and get ready for some fun!
Step-by-Step Instructions
Preparing the Oreo Mixture
To start, grab a food processor. Add the whole package of Oreo cookies. Pulse them until they become fine crumbs. This step is key. Next, add the softened cream cheese and peppermint extract. Blend it all together until smooth. Make sure there are no lumps. The mixture should look creamy and delicious.
Shaping the Truffles
Now, it’s time to form the truffles. Use your hands to scoop out about one tablespoon of the Oreo mixture. Roll it into a smooth ball. This should be easy and fun! Place each truffle on a baking sheet lined with parchment paper. Once all are formed, put the sheet in the fridge. Chill them for about 30 minutes. This helps the truffles firm up nicely.
Melting the Chocolate Coating
Next, let’s melt the chocolate. In a microwave-safe bowl, combine the semi-sweet chocolate chips and vegetable oil. This oil helps the chocolate stay smooth. Microwave the bowl in 30-second intervals. Stir well after each time. Watch closely until the chocolate is fully melted. It should be glossy and lump-free.
Coating the Truffles
Take the chilled truffles from the fridge. Use a fork to dip each one into the melted chocolate. Make sure they are fully covered. After dipping, gently tap the fork against the bowl’s edge. This will help remove any extra chocolate. Be careful not to drop them!
Adding Toppings and Final Chill
Once coated, place the truffles back on the lined baking sheet. While the chocolate is still wet, sprinkle crushed Oreos or chocolate sprinkles on top. This adds a nice crunch and makes them look great. Afterward, return the truffles to the fridge. Chill them for another 30 minutes to set the chocolate fully.
Tips & Tricks
Perfecting the Truffle Texture
To make great truffles, chill the mixture well. When cold, the mixture holds its shape better. This helps when you roll it into balls. A chilled mixture makes for a smooth truffle.
For the chocolate coating, aim for an even layer. Dip each truffle fully in the melted chocolate. Tap off any extra chocolate gently. This step helps avoid clumps and makes your truffles look neat.
Flavor Enhancements
Adjust the peppermint extract to suit your taste. If you like a stronger flavor, add a bit more. For a milder taste, use less. You can also try different types of chocolate. Dark chocolate adds richness, while milk chocolate makes it sweeter.
Mixing mint chocolate chips into the truffle filling can boost the minty taste too. This adds fun layers of flavor in each bite.
Presentation Tips
A beautiful display makes your truffles even more special. Arrange them in a decorative box or on a nice platter. You can also use cupcake liners for a fun touch.
For garnishing, add fresh mint leaves. This not only looks pretty but adds a fresh scent. Crushed Oreos on top can add color and texture. Be creative with your plating!
Pro Tips
- Use Quality Chocolate: Opt for high-quality chocolate chips for coating to ensure a smooth and rich flavor in your truffles.
- Chill for Better Coating: Make sure the truffles are thoroughly chilled before dipping to prevent them from melting in the warm chocolate.
- Experiment with Flavors: Try adding different extracts like vanilla or almond for a unique twist on the classic mint flavor.
- Storage Tips: Store the truffles in an airtight container in the refrigerator to maintain freshness and prevent them from getting too soft.
Variations
Flavor Variations
You can play with flavors to make these truffles fun and special. Try adding different extracts. Almond or vanilla can give a nice twist. Just remember, a little goes a long way.
You can also switch up the cookies. Instead of Oreos, use chocolate wafers or even peanut butter cookies. This change adds a new taste and keeps things exciting.
Dietary Modifications
If you need gluten-free truffles, use gluten-free Oreo cookies. These are easy to find in stores. They taste just as good and keep the same texture.
For vegan options, swap the cream cheese for a plant-based cream cheese. Also, choose dairy-free chocolate chips. This way, everyone can enjoy these tasty treats!
Storage Info
Best Storage Practices
Store your Minty Chocolate Oreo Truffles in an airtight container. This will keep them fresh. I recommend using a container that seals tightly. You can place parchment paper between layers to avoid sticking.
For storage conditions, refrigeration works best. The cool air helps maintain the truffle's texture. You can keep them at room temperature for a short time, but they may soften. So, it's better to store them in the fridge.
Shelf Life
You can store these truffles for up to two weeks in the fridge. They stay delicious and tasty during this time.
Watch for signs of spoilage. If the truffles smell off or the chocolate looks dull, it’s best to toss them. Also, if they feel overly soft or mushy, they may have gone bad. Keeping an eye on your treats ensures you enjoy them at their best!
FAQs
Can I make these truffles ahead of time?
Yes, you can make these truffles ahead of time. They stay fresh in the fridge. Store them in an airtight container. This keeps them moist and tasty. You can prepare them up to a week in advance. Just remember to let them chill well before serving.
What type of chocolate is best for coating?
For coating these truffles, I recommend semi-sweet chocolate. It has a nice balance of sweetness. You can also use dark chocolate for a richer taste. Milk chocolate is sweeter but may not suit everyone’s taste. Make sure the chocolate melts smoothly. Adding vegetable oil helps it coat better.
Can these truffles be frozen?
Yes, these truffles can be frozen. To freeze, place them in a single layer on a tray. Once frozen, transfer them to an airtight container. They can last up to three months in the freezer. When you want to eat them, take them out and let them thaw in the fridge. This keeps the texture just right.
You can easily make delicious mint Oreo truffles by following the steps laid out above. We covered the main ingredients and how to mix, shape, and coat the truffles perfectly. Remember, chill your mixture for the best texture. Feel free to explore flavor variations and dietary swaps that suit your needs. Store your truffles properly to keep them fresh. With simple steps and fun twists, these truffles are a treat you'll love to make and share!