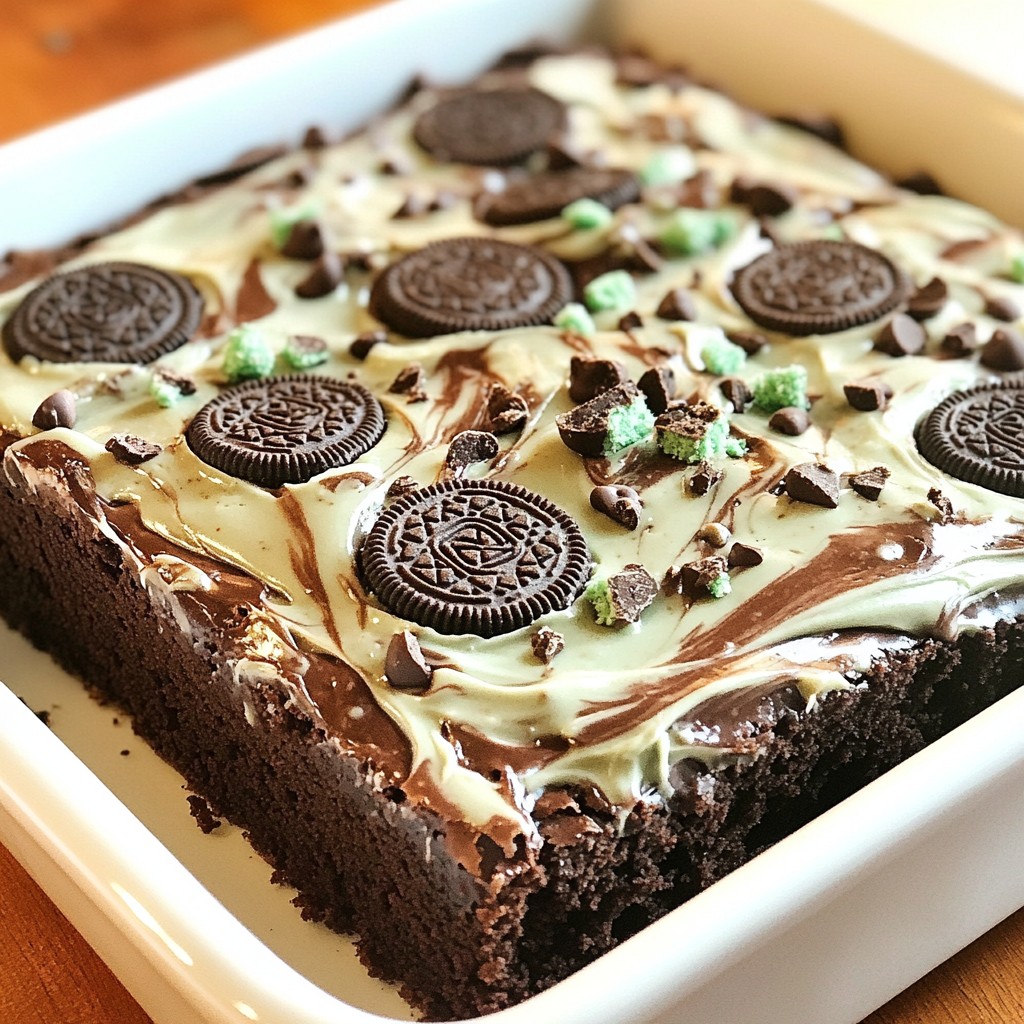
If you're a fan of sweet, rich desserts, you'll love these Chocolate Mint Oreo Brownies! In this post, I'll share my favorite recipe that combines the minty crunch of Oreos with fudgy brownie goodness. Whether you're baking for a party or just treating yourself, these brownies will impress everyone. Follow my easy steps, tips, and fun variations to create a decadent treat that’s sure to satisfy your sweet tooth! Let’s dive in!
Why I Love This Recipe
- Decadent Flavor: The combination of rich chocolate and refreshing mint creates a delightful flavor explosion in every bite.
- Easy to Make: With simple ingredients and straightforward steps, even novice bakers can whip up these brownies in no time.
- Perfect for Sharing: This recipe yields a generous amount, making it a fantastic treat for parties, gatherings, or just to share with friends.
- Visually Appealing: Topped with vibrant peppermint frosting and crunchy Oreo bits, these brownies are not just tasty but also a feast for the eyes.
Ingredients
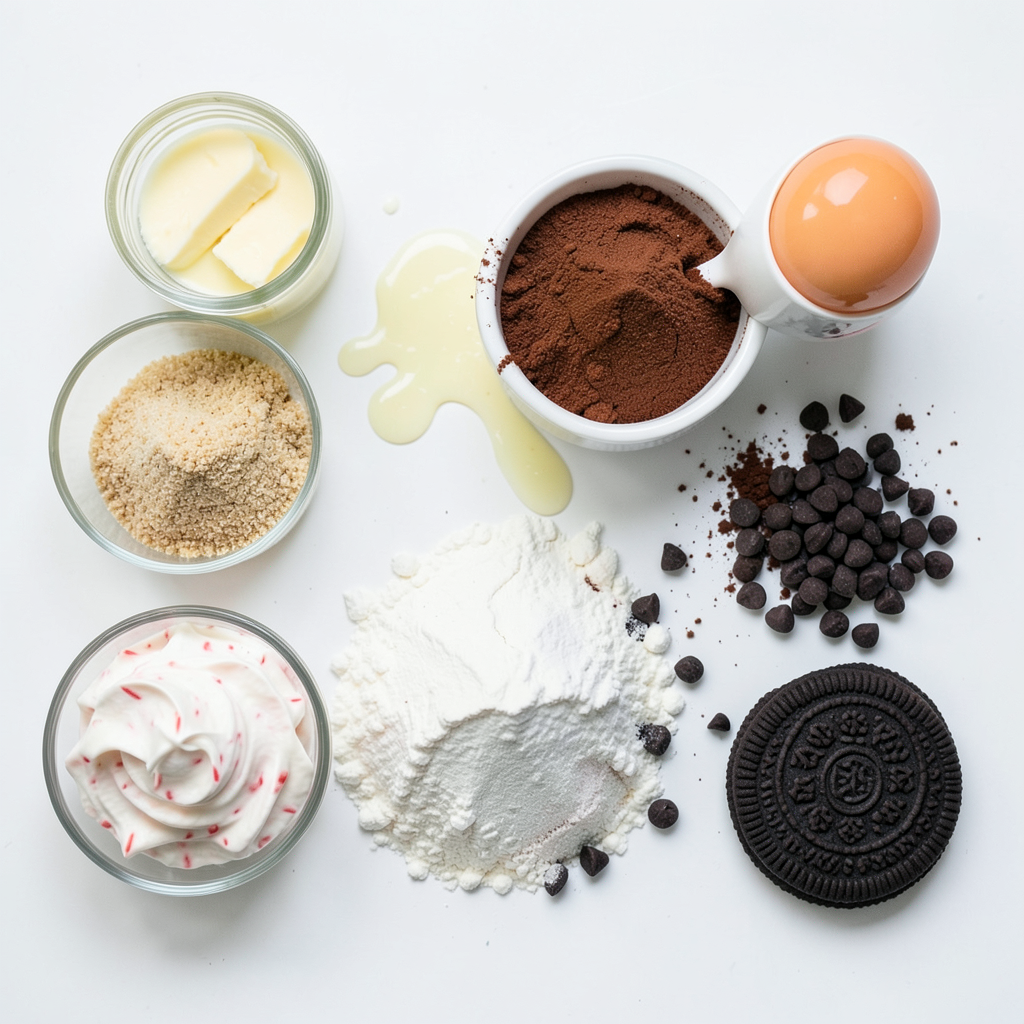
List of ingredients needed
- 1 cup unsalted butter (2 sticks), melted
- 1 cup granulated sugar
- 1 cup packed brown sugar
- 4 large eggs
- 1 teaspoon vanilla extract
- 1 cup all-purpose flour
- 3/4 cup unsweetened cocoa powder
- 1 teaspoon baking powder
- 1/2 teaspoon salt
- 1 cup chocolate chips
- 1 cup mint Oreo cookies, chopped (plus extra for topping)
- 1/2 cup of peppermint frosting (store-bought or homemade)
Measurement details
Use standard measuring cups for accuracy. Liquid ingredients like butter and eggs should be measured in liquid measuring cups. Dry ingredients like flour and sugar need dry measuring cups. Make sure to level off dry ingredients for the best results.
Substitutions and alternatives
If you don’t have unsalted butter, use salted butter but cut back on salt. Granulated sugar can be swapped with coconut sugar for a slight flavor change. For a lighter version, use egg substitutes like applesauce or flaxseed meal. If you want a gluten-free option, use a gluten-free all-purpose flour blend. For frosting, homemade peppermint frosting gives a fresh taste, but store-bought saves time.
Step-by-Step Instructions
Prepping the baking pan
Start by preheating your oven to 350°F (175°C). Grab a 9x13 inch baking pan. Grease it well with butter or line it with parchment paper. This helps with easy removal later.
Mixing wet ingredients
In a large bowl, combine 1 cup of melted butter, 1 cup of granulated sugar, and 1 cup of brown sugar. Mix until the blend is smooth and creamy. This step is key for great texture. Next, add 4 large eggs, one at a time. Whisk well after each. Finally, stir in 1 teaspoon of vanilla extract for flavor.
Combining dry ingredients
In a separate bowl, sift 1 cup of all-purpose flour, 3/4 cup of cocoa powder, 1 teaspoon of baking powder, and 1/2 teaspoon of salt. This helps to remove lumps. Gradually mix the dry ingredients into the wet ones using a spatula. Fold gently until just combined. Avoid over-mixing to keep the brownies fudgy.
Folding in chocolate chips and Oreos
Now, fold in 1 cup of chocolate chips and 1 cup of chopped mint Oreo cookies. Make sure they spread evenly throughout the batter. This adds a rich flavor and texture to your brownies.
Baking instructions
Pour the brownie batter into the prepared pan. Use a spatula to smooth it out evenly. Bake in the preheated oven for about 25-30 minutes. Check doneness by inserting a toothpick in the center. It should come out with a few moist crumbs, not wet batter.
Cooling and frosting the brownies
Once baked, remove the brownies from the oven. Let them cool completely in the pan on a wire rack. This step is vital for a chewy texture. After cooling, spread 1/2 cup of peppermint frosting on top. For an extra treat, sprinkle more chopped mint Oreos on top. Finally, cut the brownies into squares and enjoy!
Tips & Tricks
Ensuring the perfect brownie texture
To get the best brownie texture, mix the wet and dry ingredients well, but don’t over-mix. Over-mixing can make brownies tough. You want a fudgy center, so stop mixing as soon as the flour is combined. Also, let your brownies cool fully before slicing. This helps them set and stay chewy.
Recommended baking pan types
I suggest using a metal 9x13 inch baking pan. Metal pans heat up evenly and help the brownies cook well. If you prefer, you can use glass or ceramic pans, but they may need a few extra minutes in the oven. Always grease the pan or line it with parchment paper for easy removal.
How to store brownies for freshness
Store brownies in an airtight container at room temperature. They will stay fresh for about 3 to 5 days. For longer storage, wrap them tightly in plastic wrap and freeze. Frozen brownies can last up to 3 months. When you want one, just thaw it for a few minutes and enjoy!
Pro Tips
- Chill the Dough: For an even fudgier texture, consider chilling the brownie batter in the fridge for about 30 minutes before baking. This helps to create a denser brownie.
- Check for Doneness: Insert a toothpick into the center of the brownies; if it comes out with a few moist crumbs, they are done. Overbaking can lead to dry brownies.
- Customize the Frosting: Feel free to experiment with the type of frosting you use. A cream cheese frosting or chocolate ganache can also complement these brownies beautifully.
- Storage Tips: Store leftover brownies in an airtight container at room temperature for up to 3 days, or refrigerate for longer freshness.
Variations
Vegan Chocolate Mint Oreo Brownies
You can make vegan chocolate mint Oreo brownies by swapping a few ingredients. Use vegan butter instead of regular butter. Replace the eggs with flaxseed meal or applesauce. For each egg, mix 1 tablespoon of flaxseed meal with 2.5 tablespoons of water, then let it sit for a few minutes. This mix creates a great binding effect. Use your favorite vegan chocolate chips and ensure your mint Oreos are vegan, too. The result is still rich, fudgy, and delicious!
Gluten-free alternatives
If you need gluten-free brownies, switch the all-purpose flour for a gluten-free blend. Many blends work well, so choose one that you like. Check that your mint Oreos are gluten-free as some brands use wheat. The texture may vary slightly, but the flavor remains fantastic. You can also add a bit more cocoa powder to enhance the chocolate taste.
Other flavor variations
You can change the flavors easily! For a simple mint chocolate twist, add peppermint extract to the batter. Start with 1/2 teaspoon and adjust to taste. If you love peanut butter, swirl in peanut butter before baking. This gives a creamy and nutty flavor that pairs well with chocolate. You can also use different cookies. Try chocolate sandwich cookies or even vanilla Oreos for a unique taste. Each variation brings a new delight!
Storage Information
Best practices for storing brownies
To keep your brownies fresh, store them in an airtight container. This helps prevent them from drying out. Place parchment paper between layers if you stack them. This keeps the frosting from sticking. Store them at room temperature for up to four days. If you want them to last longer, refrigerate them.
Freezing brownies for later use
You can freeze your brownies for later enjoyment. First, let them cool completely. Then, cut them into squares. Wrap each square tightly in plastic wrap. Place the wrapped brownies in a freezer bag or container. Remove as much air as possible. They can stay fresh in the freezer for up to three months. When you want one, simply take it out and let it thaw at room temperature.
How to reheat brownies
To reheat brownies, first, preheat your oven to 350°F (175°C). Place the brownies on a baking sheet. Cover them with foil to keep them moist. Heat for about 10 to 15 minutes. You can also use the microwave. Place a brownie on a microwave-safe plate. Heat it for 10 to 15 seconds. This warms it up without making it too dry. Enjoy your warm brownie with a scoop of ice cream or a drizzle of chocolate sauce!
FAQs
How do I know when the brownies are done?
You can check if the brownies are done by inserting a toothpick into the center. If it comes out with a few moist crumbs, the brownies are ready. They should not have wet batter on the toothpick. This usually takes about 25 to 30 minutes of baking time. Remember, overbaking can make them dry, so keep an eye on them.
Can I use regular Oreos instead of mint Oreos?
Yes, you can use regular Oreos if you prefer. The flavor will change, but it will still be delicious. You might want to add a little peppermint extract to the batter to keep that minty taste alive. Just a half teaspoon should do the trick!
What can I use instead of peppermint frosting?
If you don't have peppermint frosting, try using chocolate frosting or cream cheese frosting. You can also make your own by mixing butter, powdered sugar, and a bit of mint extract. This will give you a nice minty flavor without store-bought frosting.
How long do these brownies last?
These brownies can last for about 3 to 5 days at room temperature. Keep them in an airtight container to keep them fresh. If you want to keep them longer, you can store them in the fridge for up to a week.
Can I make these brownies without eggs?
Yes, you can make these brownies without eggs! Use 1/4 cup of unsweetened applesauce or 1/4 cup of yogurt for each egg. This will help bind the ingredients and keep the brownies moist.
You learned about the key ingredients and steps to make perfect brownies. We explored tips for texture, storage, and tasty variations like vegan and gluten-free options. Keep these insights in mind for your next baking adventure. Enjoy your brownies fresh or frozen—either way, they’re a treat! With the right methods, you can whip up a batch everyone will love. Your baking can be fun and rewarding. Happy baking!