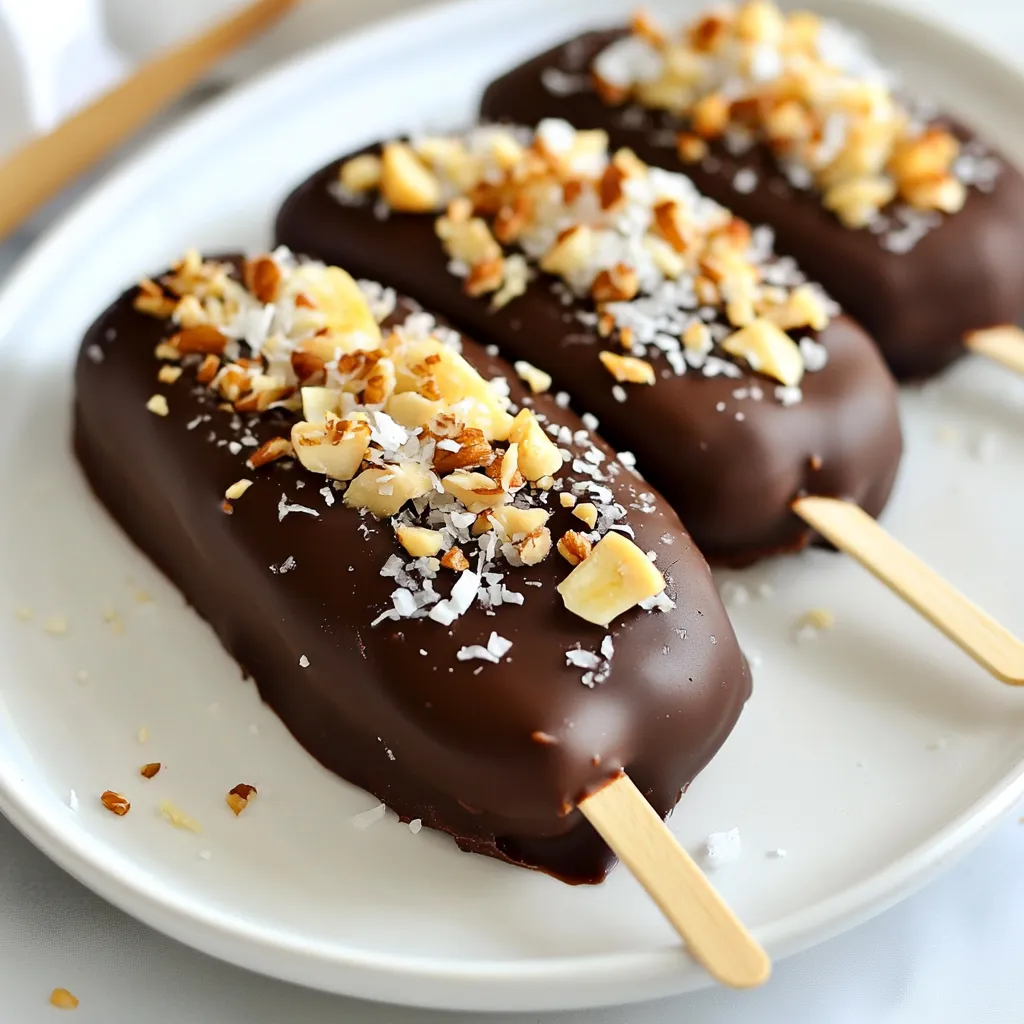
Craving a sweet treat that’s easy and fun to make? Try chocolate-covered banana pops! These simple delights are perfect for hot days or as a playful snack for kids. With just a few ingredients like ripe bananas, dark chocolate chips, and coconut oil, you can create a tasty dessert in no time. Follow my step-by-step guide to impress your friends and family with this deliciously healthy treat!
Why I Love This Recipe
- Deliciously Simple: This recipe requires only a few ingredients, making it easy to whip up whenever a craving hits.
- Fun to Make: Involving kids or friends in the dipping and decorating process makes this treat a fun activity for everyone!
- Customizable: You can switch up the toppings to suit your taste, whether you prefer nuts, coconut, or even sprinkles.
- Healthy Indulgence: Using bananas and dark chocolate makes these pops a more nutritious dessert option compared to traditional sweets.
Ingredients
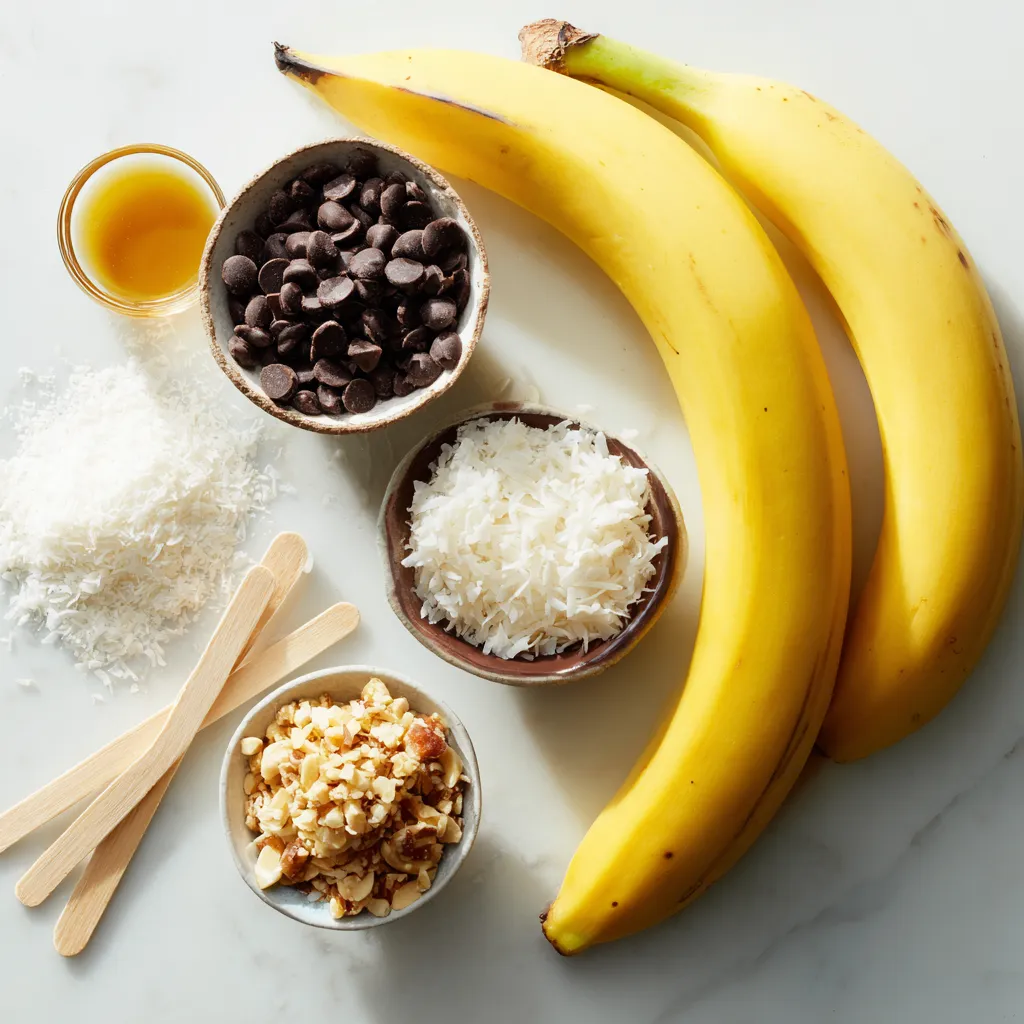
To make chocolate covered banana pops, you need a few simple ingredients. Here’s what you will need:
– Ripe bananas
– Dark chocolate chips
– Coconut oil
– Optional toppings: crushed nuts and shredded coconut
– Wooden popsicle sticks
These ingredients are easy to find. Choose ripe bananas for the best taste. Dark chocolate gives a rich flavor, while coconut oil helps the chocolate melt smoothly. You can customize your pops with toppings like nuts or coconut.
Step-by-Step Instructions
Preparing the Bananas
Start by peeling the ripe bananas. Use your hands to pull the peel down. Slice each banana in half. This gives you two equal pieces. Take a wooden popsicle stick and gently insert it into the end of each banana half. Make sure the stick goes in about halfway. This will help you hold the banana pop later.
Freezing the Banana Pops
Next, place the banana pops onto a baking sheet lined with parchment paper. Spread them out so they are not touching. This helps them freeze evenly. Put the baking sheet in the freezer for about 1 hour. Check to see if they are firm to the touch before moving on.
Melting the Chocolate
While the banana pops freeze, prepare the chocolate coating. In a microwave-safe bowl, mix the dark chocolate chips and coconut oil. Heat this mixture in the microwave. Do this in 30-second bursts. Stir well between each burst until the chocolate is melted and smooth.
Dipping the Banana Pops
Once the banana pops are frozen, it’s time to dip them. Take each frozen banana pop and dip it into the melted chocolate. Make sure to coat it well for that rich chocolate taste. After dipping, add toppings. You can roll or sprinkle crushed nuts or shredded coconut over the warm chocolate. This adds flavor and crunch.
Final Freezing and Serving
After you coat all the banana pops, place them back on the baking sheet. Leave space between them to avoid sticking. Return them to the freezer for another 30 minutes. This helps the chocolate harden. When ready to serve, take them out and enjoy chilled. For a fun look, arrange them in a tall glass or decorative dish. Drizzle some leftover melted chocolate on top for extra flair!
Tips & Tricks
Choosing the Right Bananas
You want ripe bananas for the best taste. Ripe bananas are yellow with a few brown spots. They are sweet and easy to work with. Overripe bananas are soft and mushy. They can taste too sweet and change the texture. Use ripe bananas to get the right balance of flavor and firmness for your pops.
Chocolate Dipping Techniques
To coat the banana pops evenly, dip them straight down into the melted chocolate. Hold them upright, then lift slowly. This helps the excess chocolate drip off. For a smooth coat, keep the chocolate warm. If it starts to thicken, reheat it gently in the microwave. This ensures you get that perfect chocolate layer every time.
Enhancing Flavor Combinations
You can mix it up with toppings. Try crushed nuts like almonds, walnuts, or peanuts. Shredded coconut adds a nice crunch too. Want to get fancy? Use different chocolate types. Milk chocolate is sweeter, while dark chocolate is richer. You can also add a sprinkle of sea salt or a dash of cinnamon for extra flavor. Let your creativity shine!
Pro Tips
- Use ripe bananas: Choose ripe bananas for the best flavor and creaminess. Overripe bananas will be sweeter and easier to blend with the chocolate.
- Choose high-quality chocolate: Opt for high-quality dark chocolate for a richer flavor. The quality of the chocolate will greatly impact the overall taste of your banana pops.
- Experiment with toppings: Feel free to get creative with toppings! Try adding sprinkles, crushed cookies, or even drizzles of caramel for a unique twist.
- Store properly: To keep your banana pops fresh, store them in an airtight container in the freezer. This will prevent freezer burn and maintain their delicious flavor.
Variations
Flavored Chocolate Options
You can mix things up with flavored chocolate. Adding spices or extracts can elevate your chocolate. Try a dash of vanilla extract to enhance the sweet notes. You might also enjoy a sprinkle of cinnamon for a warm twist. These flavors blend well with chocolate, making your pops even more exciting.
Alternative Fruits for Pops
Bananas are great, but other fruits can work too. Consider using strawberries or pineapple chunks. You can even try apple slices for a crunchy treat. Each fruit offers a unique taste and texture, adding fun to your pops. Experiment to see which fruit you like best!
Vegan and Dairy-Free Alternatives
If you want a vegan option, use dairy-free chocolate chips. You can also skip the coconut oil or use a plant-based alternative. This way, you still get the creamy taste without dairy. Enjoy your chocolate-covered pops while sticking to your diet!
Storage Info
Best Practices for Storing Banana Pops
To keep your chocolate covered banana pops fresh, follow these tips:
– Use airtight containers: Store the pops in a container with a tight seal. This keeps air out and prevents freezer burn.
– Layer with parchment paper: If stacking the pops, place parchment paper between layers. This stops them from sticking together.
– Keep away from strong odors: Freezers can hold strong smells. Store banana pops away from foods like fish or garlic.
Shelf Life and Freezing Tips
Chocolate covered banana pops can last up to three months in the freezer. Their taste and texture will stay good if stored properly. For the best results, eat them within the first month. This way, you enjoy the best flavor and crunch. If you notice any ice crystals, it’s a sign they may not taste as fresh. Enjoy your treat!
FAQs
Can you use other types of chocolate?
Yes, you can use different types of chocolate for your pops. Milk chocolate is sweet and creamy. White chocolate offers a rich, vanilla-like taste. Dark chocolate gives a bold flavor and pairs well with bananas. Each type will change the taste. Try what you like best for a fun twist!
How can I make these banana pops healthier?
To make healthier banana pops, consider these options:
– Use dark chocolate with a higher cocoa content. It has less sugar.
– Substitute honey or maple syrup for sugar if you want sweetness.
– Add nut butter instead of crushed nuts for protein and healthy fats.
– Use unsweetened coconut flakes for topping to cut added sugar.
What can I do if the chocolate doesn’t harden?
If your chocolate doesn’t harden, it might be too warm or thin. Here are a few tips:
– Make sure you use enough coconut oil. It helps the chocolate set.
– Chill the banana pops before dipping them in chocolate.
– After coating, put them back in the freezer immediately.
– If the chocolate is still soft, try adding more chocolate chips to thicken the mix.
This blog covered how to make tasty chocolate-covered banana pops. We discussed ingredients like ripe bananas, chocolate chips, and coconut oil. You learned step-by-step instructions for slicing, freezing, and dipping. We also explored tips for choosing bananas and storing your pops. You have lots of ideas for variations and flavors.
Enjoy making these sweet treats! They are fun, simple, and sure to pleas