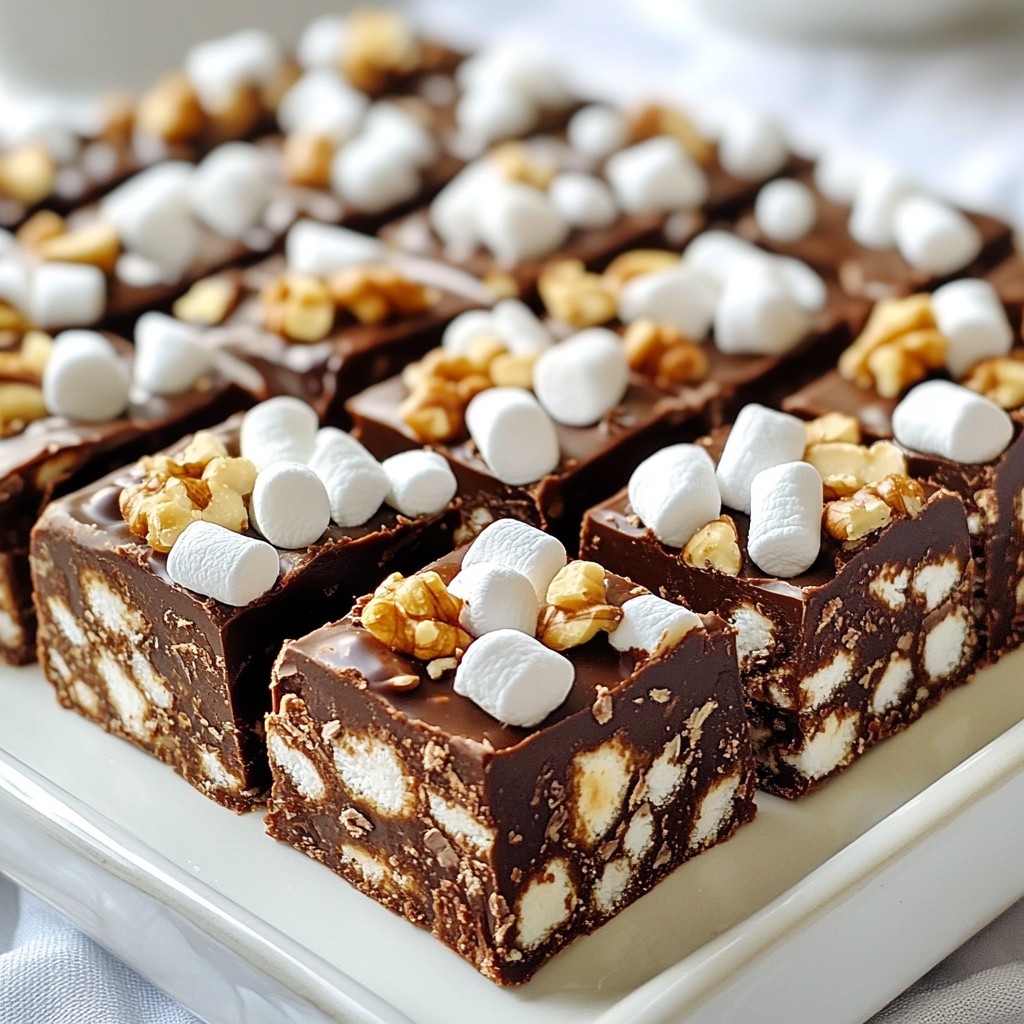
Are you ready to indulge in a rich, chocolatey treat? I’m excited to share my simple recipe for Chocolate Chip Rocky Road Fudge! This sweet delight combines creamy chocolate, crunchy nuts, and gooey marshmallows. You’ll find it easy to make and even easier to savor. With just a few steps, you’ll have a delicious fudge that’s perfect for any occasion. Let’s dive into the ingredients and get started!
Why I Love This Recipe
- Decadent Flavor: This fudge is rich and chocolatey, perfectly balanced with the sweetness of marshmallows and the crunch of nuts.
- Easy to Make:
- Versatile Toppings: Feel free to customize with your favorite nuts or add extra marshmallows for an even more indulgent experience.
- Perfect for Sharing: This recipe makes a generous batch, making it ideal for parties, gatherings, or as a sweet gift for loved ones.
Ingredients
Complete List of Ingredients
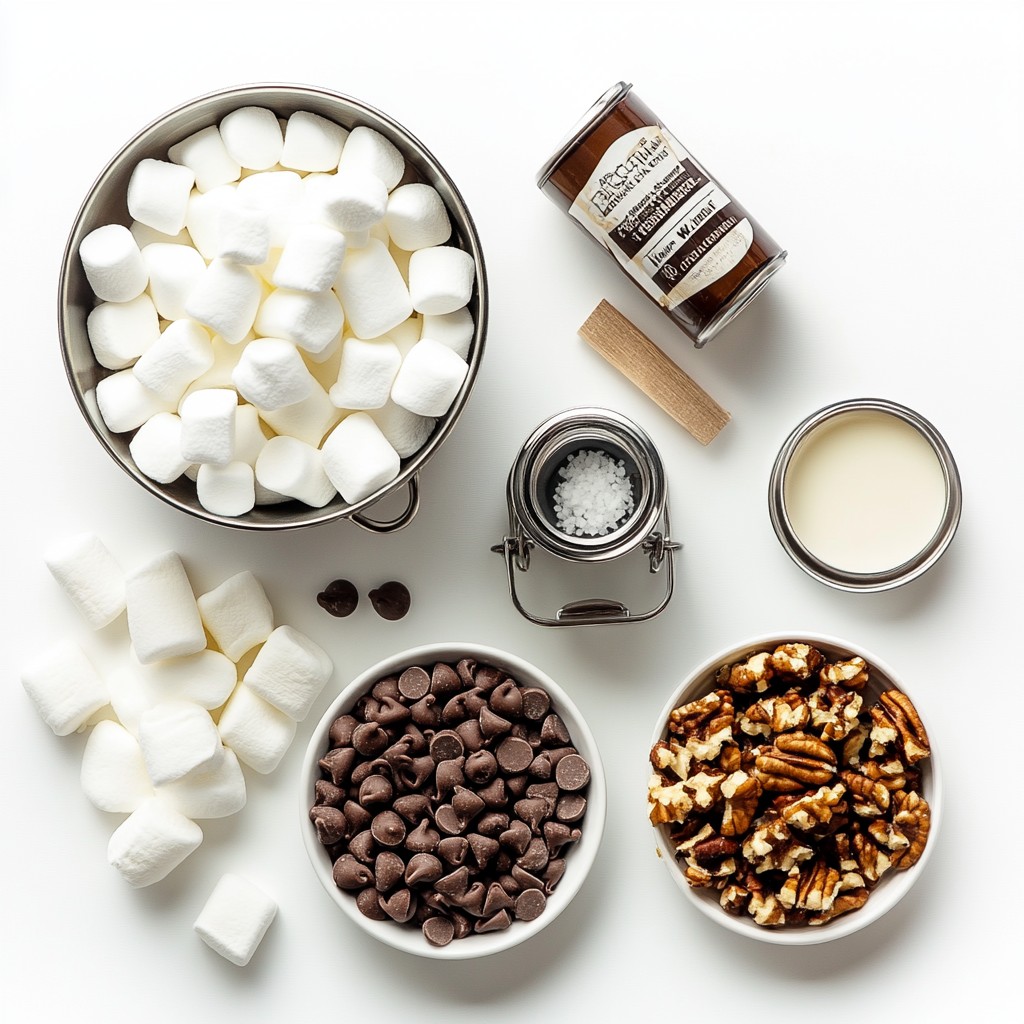
To make Chocolate Chip Rocky Road Fudge, gather these simple ingredients:
- 2 cups semi-sweet chocolate chips
- 1 cup sweetened condensed milk
- 1 cup mini marshmallows
- 1 cup chopped walnuts or pecans
- 1 teaspoon pure vanilla extract
- A pinch of sea salt
- Extra mini marshmallows and nuts for topping (optional)
Substitutions for Ingredients
You can swap some ingredients if needed:
- Chocolate Chips: Use dark chocolate chips for a richer taste.
- Nuts: Swap walnuts for almonds or skip nuts for nut-free fudge.
- Marshmallows: Use larger marshmallows, but chop them up.
- Sweetened Condensed Milk: Try coconut milk for a dairy-free option.
Measuring Tips for Accurate Results
Measuring correctly helps make your fudge perfect:
- Use dry measuring cups for solid ingredients like nuts and chips.
- Scoop the chocolate chips gently to avoid packing them too tightly.
- Use a liquid measuring cup for sweetened condensed milk, leveling off at the top.
- Keep a kitchen scale handy if you prefer weighing ingredients for precision.
By following these tips and using the right ingredients, you’ll create a fantastic fudge that everyone will love!
Step-by-Step Instructions
Preparation of Baking Dish
Start by preparing your baking dish. Grab a 9x9 inch dish and line it with parchment paper. Make sure to leave some paper hanging over the edges. This will help you lift the fudge out later. A well-prepared dish sets the stage for a perfect fudge experience.
Melting Chocolate Mixture
Next, melt the chocolate. Take a medium saucepan and set it over low heat. Add 2 cups of semi-sweet chocolate chips and 1 cup of sweetened condensed milk. Stir the mixture gently with a rubber spatula. This helps the chocolate melt evenly. Keep stirring until you get a smooth and silky mixture. Once melted, remove the saucepan from heat. Add 1 teaspoon of pure vanilla extract and a pinch of sea salt. Mix well to combine these flavors.
Mixing Ingredients and Pouring Fudge
Now, it’s time to mix in the fun parts. Gently fold in 1 cup of mini marshmallows and 1 cup of chopped walnuts or pecans. Take care not to squish the marshmallows too much. You want them to stay fluffy. After all is mixed, carefully pour the fudge into the prepared baking dish. Use a spatula to spread it evenly. For an extra treat, sprinkle more mini marshmallows and nuts on top.
Chilling and Cutting the Fudge
Place the baking dish in the refrigerator. Let the fudge chill for at least 2 hours. You want it to become firm to the touch. After it sets, lift the fudge out using the parchment paper. Transfer it to a cutting board and use a sharp knife to cut it into squares. Wipe the knife between cuts for clean edges. Your delicious Chocolate Chip Rocky Road Fudge is ready to enjoy!
Tips & Tricks
How to Achieve the Perfect Texture
To get the best fudge texture, melt the chocolate slowly. Use low heat to avoid burning it. Stir constantly until the chocolate is smooth. The sweetened condensed milk helps make it creamy. Adding a pinch of sea salt enhances the chocolate flavor. Make sure to fold in the marshmallows and nuts gently. This keeps them intact and adds a nice bite.
Common Mistakes to Avoid
One common mistake is overheating the chocolate. If it gets too hot, the fudge can become grainy. Another mistake is not lining the baking dish well. If the parchment paper sticks, it’s hard to lift the fudge out. Also, avoid mixing too aggressively. This can squish the marshmallows and nuts. Lastly, be sure to chill the fudge long enough. If you cut it too soon, it can fall apart.
Serving and Presentation Suggestions
When serving, cut the fudge into neat squares. Use a sharp knife and wipe it between cuts. For a fun touch, sprinkle extra marshmallows and nuts on top. You can arrange the fudge on a decorative platter. Dust it with cocoa powder for flair. For gifts, place the fudge in clear bags tied with ribbons. It looks great and tastes even better!
Pro Tips
- Chill Time Matters: Allow the fudge to chill for a full 2 hours to ensure it sets properly. If it's too soft, it may not hold its shape when cut.
- Choose Quality Chocolate: Use high-quality semi-sweet chocolate chips for the best flavor. The better the chocolate, the richer your fudge will taste.
- Mix-Ins Variety: Feel free to get creative with your mix-ins! Try adding dried fruits or different nuts for a unique twist on the classic rocky road.
- Presentation Perfection: For an added touch, drizzle melted chocolate over the top after it sets, or dust with powdered sugar before serving for a beautiful finish.
Variations
Alternative Nuts and Mix-ins
You can change the nuts in your fudge to suit your taste. Walnuts give a nice crunch. Pecans add a sweet, buttery flavor. If you prefer, try almonds or hazelnuts. Both add a unique twist. You can also use seeds like pumpkin or sunflower for a nut-free version. Mix-ins like crushed cookies or toffee bits can add fun textures too. Feel free to get creative!
Vegan and Dairy-Free Options
To make this fudge vegan, swap the sweetened condensed milk. Use coconut milk or almond milk with a thickener. You can also find vegan chocolate chips in stores. These swaps will keep the fudge creamy and rich. Check the labels to ensure they are dairy-free. This way, everyone can enjoy this tasty treat.
Flavor Enhancements and Add-Ins
Want to boost the flavor? Add a splash of almond extract for a nutty kick. A pinch of espresso powder can make the chocolate taste richer. You can also mix in dried fruit, like cherries or cranberries, for a fruity twist. These small changes can make your fudge even more delightful. Experiment to find your favorite mix!
Storage Info
Best Practices for Storing Fudge
To keep your Chocolate Chip Rocky Road Fudge fresh, store it in an airtight container. Use wax paper or parchment paper to separate layers of fudge. This helps prevent sticking. Place the container in a cool, dry place away from sunlight. Avoid heat sources, as they can melt your fudge.
Freezing Instructions for Longer Storage
If you want to keep fudge for a long time, freezing is a great option. First, cut the fudge into squares. Wrap each piece in plastic wrap tightly. Then, place them in a freezer-safe bag or container. Be sure to label the bag with the date. You can freeze it for up to three months. To enjoy, thaw the fudge in the fridge overnight before serving.
Shelf Life of Chocolate Chip Rocky Road Fudge
When stored properly, your fudge lasts about one week at room temperature. If you keep it in the fridge, it can last two to three weeks. Storing it in the freezer extends its life to three months. Always check for any signs of spoilage, like changes in color or smell, before eating.
FAQs
What can I use instead of sweetened condensed milk?
You can use coconut cream or evaporated milk instead of sweetened condensed milk. Both options work well. Coconut cream adds a nice flavor, while evaporated milk keeps it creamy. You can also mix milk with sugar to mimic sweetened condensed milk. This swap keeps your fudge rich and sweet.
How do I know when the fudge is set?
The fudge is set when it’s firm to the touch. You can press down gently on the top. If it bounces back, it’s ready! You can also check the edges. They should pull away slightly from the pan. If you see this, your fudge is good to go.
Can I make this fudge in advance for an event?
Yes, you can make this fudge in advance! It stores well in the fridge for up to two weeks. Just wrap it tightly in plastic wrap or place it in an airtight container. For longer storage, you can freeze it for up to three months. Just remember to slice it into squares before freezing for easy serving later!
In this guide, we explored all you need to make tasty chocolate chip rocky road fudge. We covered ingredients, step-by-step instructions, and valuable tips to avoid common mistakes. You learned about fun variations and how to store your fudge for longer freshness. My final thoughts: with the right methods, anyone can create this sweet treat. Enjoy your fudge-making journey, and have fun experimenting with flavors!