FREE DINNER EBOOK! Get your copy!
  • Cookie Policy
  • GDPR Policy
  • Disclaimer
  • Terms Of Use
  • Visit my other site: Fun Cookie Recipes
crunchy chronicle
  • Home
  • Dinner
  • Desserts
  • Drinks
  • Appetizers
  • Contact
  • About
  • Privacy Policy
  • Home
  • Dinner
  • Desserts
  • Drinks
  • Appetizers
  • Contact
  • About
  • Privacy Policy
  • Cookie Policy
  • GDPR Policy
  • Disclaimer
  • Terms Of Use
Visit my other site: Fun Cookie Recipes

HOME / CATEGORIES /

Latest

To make these delightful cookies, you will need the following items: - 1 box of strawberry cake mix - 1/2 cup of vegetable oil - 2 large eggs - 1 tablespoon of fresh lemon juice - Zest of 1 lemon (about 1 teaspoon) - 1/2 cup of white chocolate chips or lemon-flavored chips - 1/4 cup of powdered sugar (for dusting) - A pinch of salt These ingredients create a soft, sweet dough with a bright lemon flavor. You can add more flavors to your cookies. Here are some fun ideas: - Fresh strawberries, diced small - Lemon zest for extra zing - A handful of nuts, like pecans or walnuts - A sprinkle of coconut for a tropical twist These options can add texture and depth to each bite. If you don't have some ingredients, don't worry! Here are some easy swaps: - Instead of vegetable oil, use melted coconut oil or butter. - For eggs, try using applesauce or a flaxseed mixture. - If you can't find lemon juice, use a splash of vinegar mixed with water. These substitutes can help you make the cookies even if you are missing some items. First, you need to preheat your oven to 350°F (175°C). This step helps the cookies bake evenly. While the oven heats, grab a baking sheet and line it with parchment paper. This paper prevents the cookies from sticking and makes clean-up easier. In a large bowl, pour in 1/2 cup of vegetable oil. Crack in 2 large eggs. Add 1 tablespoon of fresh lemon juice and the zest of 1 lemon. Use a whisk to mix these ingredients well until you have a smooth blend. It is important to mix thoroughly to combine all the flavors. Now, it’s time to add the fun part! Gradually sprinkle in the box of strawberry cake mix. Use a spatula to stir the mixture. Keep stirring until there are no dry pockets left. The dough will be thick. Next, fold in 1/2 cup of white chocolate chips or lemon-flavored chips. Be gentle to avoid over-mixing. Using a cookie scoop or a spoon, drop rounded balls of dough onto your prepared baking sheet. Make sure to leave about 2 inches between each cookie. This space allows them to spread out while baking. Place the baking sheet in your preheated oven. Bake the cookies for 10 to 12 minutes. Watch them closely. You want the edges to be lightly golden. Remember, they will firm up as they cool. After baking, let the cookies cool on the sheet for 2-3 minutes. Then, transfer them to a wire rack to cool completely. For a lovely finish, lightly dust with powdered sugar. To get the best texture in your cookies, follow these tips: - Use fresh ingredients: Fresh eggs and oil help the dough mix well. - Mix gently: Stir the dough just until combined. Over-mixing can make them tough. - Chill the dough: If your dough feels soft, chill it for 30 minutes. This helps cookies hold shape. - Check the bake time: Watch your cookies closely near the end. They should be lightly golden on the edges. Here are some mistakes to steer clear of: - Skipping the lemon zest: This adds a bright flavor. Don't leave it out! - Not spacing cookies: Leave 2 inches between each scoop. They will spread while baking. - Overbaking: Remove cookies when edges are golden. They will firm up as they cool. - Using cold ingredients: Room temperature eggs mix better and create a smoother batter. You can easily switch up flavors to make these cookies your own: - Swap cake mix: Use lemon or vanilla cake mix for a different taste. - Add nuts: Chopped macadamia nuts or almonds add a nice crunch. - Use different chips: Try dark chocolate chips for a richer flavor. - Mix in fruit: Diced strawberries or blueberries can enhance the fruity notes. {{image_4}} You can switch up the flavor using other cake mixes. Try a lemon cake mix for extra zing. A vanilla cake mix adds a neutral base to highlight the lemon flavor. You can even use a funfetti mix for a colorful twist. Each option gives a new taste and look to your cookies. Mix-ins can brighten your cookies. Try adding nuts for crunch. Chopped strawberries give a fresh burst. If you love citrus, add orange zest for a zesty kick. You can also use mini marshmallows for a chewy texture. Each mix-in adds a touch of fun to your cookies. A lemonade glaze can take your cookies to the next level. Mix powdered sugar with lemon juice for a smooth glaze. Drizzle it over the cooled cookies for a sweet finish. You can also add zest for more flavor. This icing not only adds taste but also makes your cookies look fancy. To keep your strawberry lemonade cake mix cookies fresh, use an airtight container. Place the cookies in a single layer. If you have many cookies, add parchment paper between layers. This keeps them from sticking. Store the container at room temperature. They stay good for about five days. Freezing cookies extends their shelf life. First, let your cookies cool completely. Then, place them in a single layer on a baking sheet. Freeze them for one hour. Once frozen, transfer the cookies to a freezer-safe bag. Squeeze out as much air as possible before sealing. They can last up to three months in the freezer. To enjoy your frozen cookies, take out only what you need. Let them sit at room temperature for about 15 minutes. For a warm treat, preheat your oven to 350°F (175°C). Bake the cookies for about five minutes. This will make them soft and fresh again. Enjoy every bite! Yes, you can! If you want to try other flavors, use a vanilla or lemon cake mix. Each will give your cookies a new taste. Just keep the same amounts of oil and eggs. This change can make your cookies unique and fun. Watch the edges of the cookies. They should be lightly golden. The center may look soft, but that is okay. Cookies will firm up as they cool. Use a timer for 10 to 12 minutes, but check early if your oven runs hot. If the dough sticks to your hands or the bowl, add a bit of flour. Start with one tablespoon and mix. Keep adding a little until it is easier to handle. Remember, it should be thick but not too sticky. These cookies last about 3 to 5 days at room temperature. Store them in an airtight container. This keeps them soft and fresh. If you want them to last longer, try freezing them! You learned about making tasty strawberry lemonade cake mix cookies. We covered key ingredients, cooking steps, and tips for the best cookies. Whether you want to add unique flavors or store them well, these cookies are easy and fun. Try different cake mixes or toppings for fun twists. Remember, baking should be joyous and simple. Enjoy every bite of your delicious creations!

Strawberry Lemonade Cake Mix Cookies Easy and Delightful

- 12 oz (340g) pasta (penne or farfalle) - 2 roasted red bell peppers, diced - 2 cups vegetable broth To make this dish, you need just a few main ingredients. First, choose your pasta. Penne or farfalle work great here. Both types soak up the sauce well. Next, grab two roasted red bell peppers. These add a sweet and smoky flavor. Finally, you need two cups of vegetable broth. This broth gives your pasta a rich taste. - 1 cup heavy cream or coconut cream - 1 cup grated Parmesan cheese (optional) For creaminess, you have two choices. You can use heavy cream for a rich texture. If you want a dairy-free option, coconut cream is perfect too. It brings a sweet note to the dish. You might also sprinkle grated Parmesan cheese on top. This adds a savory touch. - 1 medium onion, finely chopped - 3 cloves garlic, minced - 1 teaspoon smoked paprika - 1/2 teaspoon red pepper flakes (or to taste) - Salt and pepper, to taste Aromatics make your dish fragrant. Start with one medium onion, finely chopped. Then add three cloves of minced garlic. These two ingredients create a wonderful base. Next, include one teaspoon of smoked paprika for depth. If you like heat, add red pepper flakes. Use half a teaspoon, or more if you prefer it spicy. Don’t forget salt and pepper to taste! These seasonings balance all the flavors. This simple list of ingredients creates a tasty one-pot meal. You can mix and match based on your taste. Now, let's get cooking! Start by heating a drizzle of olive oil in a large pot over medium heat. Add the finely chopped onion and minced garlic. Sauté them together for about 3 to 4 minutes. Stir often until the onion becomes soft and glossy. This step builds a flavorful base for your dish. Next, mix in the diced roasted red bell peppers. Let them cook with the onion and garlic for another 2 to 3 minutes. This allows the sweet flavors of the peppers to blend well. You will notice a lovely aroma in your kitchen. Now, add the dry pasta to the pot. Make sure it mixes well with the onion and pepper blend. Pour in the vegetable broth, ensuring the pasta is fully submerged. Bring the mixture to a gentle boil. This will help the pasta absorb all the flavors. Once the pot is boiling, reduce the heat to low and cover it. Allow the pasta to simmer for 10 to 12 minutes. Stir occasionally to keep the pasta from sticking together. This helps achieve the perfect al dente texture. When the pasta is cooked, stir in the heavy cream or coconut cream. Add in the smoked paprika, red pepper flakes, and chopped spinach. Cook for another 2 to 3 minutes. The spinach will wilt, and the sauce will thicken to a creamy consistency. Taste your dish and adjust with salt and pepper as needed. If you want a thinner sauce, add a splash more vegetable broth. Once you have the flavors just right, remove the pot from heat. Serve the pasta hot, garnishing with fresh basil leaves and grated Parmesan cheese if you like. - Ensuring pasta doesn't stick: Stir the pasta often while it cooks. This keeps it from clumping. After adding the broth, make sure the pasta is fully submerged. The steam helps to cook it evenly. - Adjusting sauce thickness: If the sauce is too thick, add a splash of broth. Stir well to blend. For a thicker sauce, let it simmer a little longer. The cream will help make it rich and creamy. - Additional spices or herbs to consider: You can add fresh herbs like thyme or oregano. These bring a fresh taste. A pinch of cayenne adds heat if you like spice. You can also try a squeeze of lemon juice for brightness. - Plating techniques for an appealing look: When serving, twirl the pasta on a fork and place it in the center of the plate. This creates height. Drizzle some sauce over the top for a shiny finish. Garnish with whole basil leaves to add color. A sprinkle of Parmesan cheese finishes the dish nicely. {{image_4}} You can easily change the pasta. Try gluten-free options like chickpea or brown rice pasta. These choices are tasty and perfect for those with dietary needs. For the cream, you can swap heavy cream for coconut cream or cashew cream. This makes the dish lighter while still creamy. These alternatives add a lovely flavor. To boost protein, add chicken, shrimp, or tofu to your dish. Cook them in the pot before adding the pasta. This gives your meal more depth and makes it more filling. You can also add more vegetables. Mushrooms or zucchini work well. Just slice them and toss them in with the onions. They will add color, flavor, and nutrition. If you like heat, adjust the red pepper flakes to your taste. Start with a little and add more if you want. This way, you control the spice level. You can also add hot sauce or chili oil. A few drops can make the dish pop with flavor. Just remember, it’s easy to add more heat, but hard to take it away! To store leftovers, let the pasta cool first. Place it in an airtight container. You can keep it in the fridge for up to three days. Make sure to label the container with the date. This helps you keep track of freshness. When you are ready to eat again, reheat the pasta gently. You can use the stove or microwave. For the stove, add a splash of vegetable broth to keep it creamy. Heat on low, stirring often. If using a microwave, cover the dish and heat in short bursts. Stir in between to warm it evenly. For long-term storage, you can freeze the pasta. Allow it to cool completely, then transfer it to a freezer-safe container. Make sure to leave some space for the pasta to expand. It can last for up to three months in the freezer. When you want to eat it, thaw it overnight in the fridge before reheating. Yes, you can make this dish vegan. For the cream, use coconut cream or any plant-based cream. Instead of Parmesan cheese, try nutritional yeast for a cheesy flavor without dairy. You can also add vegan cheese if you want a creamier texture. Cooking pasta in this recipe takes about 10 to 12 minutes. You want it to be al dente, which means it should be firm but cooked through. Stir it occasionally to keep it from sticking together. You can use fresh red peppers, but they will need more cooking. Chop them and sauté them with the onion and garlic for about 5 to 7 minutes. This softens them and brings out their sweetness. If you prefer, you can roast them in the oven for a smoky flavor. This pasta pairs well with a fresh green salad or garlic bread. You could also serve it with roasted vegetables or a light soup for a complete meal. A glass of white wine can enhance the flavors nicely too. This blog post guides you on making a creamy red pepper pasta. You learned about key ingredients like pasta, roasted peppers, and rich cream. I shared step-by-step instructions to help you sauté, mix, and simmer your dish. You also got tips for enhancing flavor and storing leftovers. With these insights, you can create your perfect pasta dish. Enjoy experimenting with flavors and textures to make it your own!

One-Pot Creamy Red Pepper Pasta Simple and Tasty Meal

- 1 cup caramel sauce - 8 oz cream cheese - 1/2 cup packed brown sugar - 1 tsp pure vanilla extract - 1/2 cup toffee bits - 2 medium-sized apples - 1/4 cup chopped nuts (optional) To make this dip, start with 1 cup of caramel sauce. You can use store-bought or homemade. I love making my own for that extra touch. Next, grab 8 oz of cream cheese. Make sure it's softened for easy mixing. You will also need 1/2 cup of packed brown sugar. This adds sweetness and depth. Then, get 1 tsp of pure vanilla extract. It gives a hint of warmth to the dip. You will want 1/2 cup of toffee bits, which add a delightful crunch. For the apples, pick 2 medium-sized ones. I recommend using green apples for a nice tart flavor. Lastly, consider adding 1/4 cup of chopped nuts. Pecans or walnuts work great for added texture. With these ingredients, you will create a treat that everyone will love. The mix of sweet caramel and crunchy toffee makes it special. Plus, the fresh apples provide a crisp balance. Whether it’s for a party or a family snack, this dip is sure to impress! - Soften cream cheese: Start by letting your cream cheese sit at room temperature. This makes it easy to mix. - Mix cream cheese and brown sugar: In a bowl, combine the softened cream cheese and brown sugar. Use a hand mixer or whisk to blend them well. The mixture should be smooth and creamy. - Incorporate vanilla extract: Next, add one teaspoon of pure vanilla extract to your creamy mix. Mix until it’s fully blended in. - Fold in caramel sauce: Gently add the caramel sauce to the cream cheese mixture. Be careful not to deflate the creaminess while mixing. - Add toffee bits: Now, fold in the toffee bits. Make sure to save some bits for topping later. - Mix in optional nuts: If you want a crunchy texture, add chopped nuts. Pecans or walnuts work great. Mix until everything is evenly spread out. - Transfer to serving bowl: Spoon your dip into a nice serving bowl. Smooth the top for a pretty look. - Drizzle with caramel and toppings: To make it extra delicious, drizzle some caramel sauce on top. Then, sprinkle the reserved toffee bits and any nuts you used. This adds a nice crunch and looks great. Enjoy your caramel apple dip with crisp apple slices for a tasty treat! - Choosing the right apples: I recommend using green apples. Their tart flavor perfectly balances the sweet caramel. Crisp apples add a nice crunch too. - Storing caramel sauce properly: If you have leftover caramel, store it in an airtight container. Refrigerate for up to two weeks. When you're ready to use it, gently warm it in the microwave. - Avoiding deflation in mixing: When you fold in the caramel, do it gently. This keeps the dip creamy and light. If you mix too hard, the texture may become flat. - Pairing with snacks: Serve this dip with apple slices for a classic touch. You can also try pretzels or graham crackers. They add a fun twist to the flavor. - Presentation ideas: Use a clear bowl to showcase the layers of the dip. Add a drizzle of caramel on top and sprinkle with extra toffee bits. This makes your dip look as good as it tastes! {{image_4}} You can make caramel apple dip your own by adding different toppings. Try chocolate chips for a rich twist. Sprinkles can add a fun pop of color. Both options make the dip more exciting. You can also switch up the fruit. While apples are great, pears work just as well. Sliced bananas are another tasty choice. They add a creamy texture and sweetness. If you need gluten-free options, this dip is already a great choice. Just ensure your caramel sauce is gluten-free. Most brands are, but always check the label. For vegan alternatives, you can use coconut cream instead of cream cheese. Use a plant-based caramel sauce too. This way, everyone can enjoy the dip without worry. To keep your caramel apple dip fresh, store it in an airtight container. Refrigerate it right after serving to prevent spoilage. This dip stays creamy and delicious when sealed well. If you need to reheat it, do so gently. Place the dip in a microwave-safe dish, cover it loosely, and heat for about 10-15 seconds. Stir well to ensure even warmth. Avoid overheating, as it can change the texture. Your dip can last in the fridge for about 3-5 days. After that, it may lose its flavor and texture. Watch for signs of spoilage. If you see any discoloration or off smells, toss it out. Always trust your senses when it comes to food safety. Can I use homemade caramel sauce? Yes, you can use homemade caramel sauce. Making it at home adds a personal touch. Just ensure it is thick enough to hold its shape. What other fruits can I serve with the dip? You can serve many fruits with this dip. Try pears, bananas, or strawberries. These fruits pair well and add variety. How can I make it nut-free? To make this dip nut-free, just skip the nuts. It will still taste great. You can add more toffee bits for crunch instead. Can this be made ahead of time? Yes, you can prepare the dip ahead of time. Just store it in the fridge until you are ready to serve. What’s the best way to serve it for a party? For a party, serve the dip in a large bowl. Arrange apple slices around it. Add extra toffee bits on top for a fun look. This blog post covered a delicious caramel dip recipe. We explored ingredients like cream cheese, caramel sauce, and toffee bits. You learned easy steps for preparation and mixing. We discussed tips for perfecting this treat, along with fun ways to customize it. Storing leftovers was also addressed to keep your dip fresh. In summary, this dip is versatile and simple to make. Enjoy it with your favorite fruits or snacks. You’ll impress everyone at your next gathering with this sweet and creamy delight.

Caramel Apple Dip with Toffee Delightful Treat

To make Air Fryer Cinnamon Roll Bites, you will need a few simple ingredients. Here’s what you will need: - 1 can of refrigerated cinnamon roll dough (contains 8 rolls) - 1/4 cup granulated sugar - 2 teaspoons ground cinnamon - 2 tablespoons melted butter - 1/2 cup cream cheese frosting (from the cinnamon roll package or a homemade version) - Optional: a pinch of sea salt for garnish These ingredients come together to create a sweet, warm treat that is perfect for any time of day. The cinnamon roll dough gives you a soft base, while the sugar and cinnamon add that classic flavor. The melted butter helps everything stick together and adds richness. The cream cheese frosting is the cherry on top, making these bites irresistible. If you want a little extra touch, sprinkle on some sea salt for a savory contrast. Using these ingredients, you can whip up a delightful snack in no time. First, set your air fryer to 350°F (175°C). Preheating is key. It helps the cinnamon roll bites cook evenly. When the air fryer is hot, the bites get that nice, golden look. Open your can of cinnamon roll dough. Carefully separate each roll. Use a sharp knife or scissors to cut each roll into quarters. This gives you bite-sized pieces. Make sure all pieces are even. This helps them cook at the same time. Grab a medium bowl. Pour in the melted butter. Add your quartered dough pieces. Toss them gently to coat with butter. This step makes the flavors pop. Next, mix sugar and cinnamon in a small bowl. Sprinkle this mixture over the buttered dough pieces. Toss again until they are all coated in the sweet mix. Now, arrange the cinnamon roll bites in the air fryer basket. Place them in a single layer. Leave space between them. They will puff up while cooking. If your basket is small, cook in batches. Air fry for 8-10 minutes. Halfway through, shake the basket gently. This helps them brown evenly. Once they are done, carefully take them out with tongs. Let the bites cool on a wire rack for a few minutes. This makes them easier to frost. Drizzle cream cheese frosting over the warm bites. If you want, warm the frosting first for a smoother drizzle. For a tasty twist, sprinkle a pinch of sea salt on top. It adds a delightful contrast to the sweetness. To get the best texture for your cinnamon roll bites, first, preheat your air fryer to 350°F (175°C). This step is key. It helps the bites cook evenly and turn a lovely golden brown. When you place the bites in the air fryer, don't overcrowd the basket. Give each piece space to expand as they cook. If necessary, cook in batches. This way, each bite will have that perfect crispness. For the cream cheese frosting, you can warm it up for a smooth drizzle. Just pop it in the microwave for a few seconds. Be careful not to melt it too much! If you want to try different frostings, consider chocolate or vanilla. These can add a fun twist to your bites. When it comes to serving, presentation matters. Place your cinnamon roll bites on a colorful plate or in a small basket. Line it with parchment paper for a nice touch. For added flair, sprinkle a little extra cinnamon sugar on top. This really makes them pop! Pair these bites with coffee or milk for a tasty treat. {{image_4}} You can make your Air Fryer Cinnamon Roll Bites even more fun. Try adding nuts or chocolate chips. Just toss a handful into the cinnamon sugar mix. This brings a nice crunch and extra sweetness. You can also switch up the frosting flavors. Instead of cream cheese, use vanilla or chocolate frosting. Each option gives a new twist to the flavor. If you want to try something different, use other types of dough. Biscuit dough works great too. It gives a fluffier texture. For those who need gluten-free options, look for gluten-free cinnamon roll dough. These alternatives are tasty and easy to find in stores. Make your bites fit the seasons with holiday-themed variations. In fall, add pumpkin spice to the cinnamon sugar. During winter, mix in some peppermint extract. You can also incorporate seasonal spices like nutmeg or ginger. These twists keep the recipe fresh and exciting year-round. To keep your cinnamon roll bites fresh, store them in an airtight container. This helps prevent them from drying out. You can use a glass or plastic container with a tight-fitting lid. Make sure the bites cool to room temp before sealing. This way, moisture won't build up inside. When it's time to enjoy your leftover bites, reheating them is easy. The best method is to use the air fryer. Set it to 350°F for about three to five minutes. This keeps the bites crispy. You can also use a microwave, but they may get a bit soft. If you choose this method, heat for about 10-15 seconds. Cinnamon roll bites can last for about three days when stored properly. If you see any mold or if they smell off, it's time to toss them. Freshness is key to enjoying these treats! Yes, you can use homemade dough. To make it from scratch, mix flour, sugar, yeast, and milk. Knead until smooth, then let it rise. Roll out the dough and sprinkle with cinnamon and sugar. Cut it into pieces to create your bites. This adds a personal touch and taste. You can use many alternatives. Try vanilla icing, chocolate ganache, or even maple glaze. Each option gives a new flavor twist. If you like fruity flavors, consider a berry cream or lemon icing. These variations keep things fun and interesting. To make them healthier, reduce the sugar in the dough. You can also use whole wheat flour for added fiber. Instead of cream cheese frosting, try yogurt or a light glaze. Adding nuts or seeds also boosts nutrition without sacrificing taste. Yes, you can prepare them in advance. Cut and coat the dough, then store it in the fridge. When ready to cook, just pop them in the air fryer. This saves time and makes it easy for a quick treat. To ensure even cooking, preheat your air fryer. Arrange the bites in a single layer, leaving space between them. Shake the basket halfway through cooking. This helps them brown nicely and puff up perfectly. Following these steps makes a big difference in texture and taste. You learned how to make delicious air fryer cinnamon roll bites. We covered the key ingredients, step-by-step instructions, and expert tips. You can customize these bites with your favorite flavors and toppings. Remember to store leftovers properly to keep them fresh. Whether for a snack or a treat, these bites are easy and fun to make. Enjoy sharing them with friends and family. Happy cooking!

Air Fryer Cinnamon Roll Bites Delicious and Easy Treat

To create a delicious One-Pot Alfredo Spinach Tortellini, gather the following ingredients: - 10 oz refrigerated cheese tortellini - 2 cups fresh spinach, roughly chopped - 1 cup heavy cream (preferably at room temperature) - 1 cup vegetable broth (low-sodium recommended) - 1 cup grated Parmesan cheese (freshly grated for best flavor) - 2 cloves garlic, minced - 1 tablespoon extra virgin olive oil - 1 teaspoon Italian seasoning (dried) - Salt and freshly ground black pepper to taste - Fresh basil leaves for garnish Each ingredient plays a key role in crafting this creamy dish. The cheese tortellini serves as the main star, bringing a delightful texture. Fresh spinach adds a pop of color and nutrients. Heavy cream gives the dish its rich, velvety sauce, while vegetable broth enhances the overall flavor. Using freshly grated Parmesan cheese ensures the best taste. Garlic brings a warm aroma and depth. Olive oil is essential for sautéing the garlic. Italian seasoning adds a hint of herbaceous flavor, and salt and pepper allow you to adjust the seasoning to your liking. Finally, fresh basil elevates the presentation and taste. With these key ingredients, you are ready to create a meal that is both simple and satisfying. Enjoy the process! - Sautéing garlic First, heat a large pot over medium heat. Add one tablespoon of olive oil. Once the oil shimmers, add two minced garlic cloves. Sauté for about one minute. The garlic should smell good and turn golden. Be careful not to burn it. - Combining liquids Next, slowly pour in one cup of vegetable broth and one cup of heavy cream. Stir gently to mix the liquids well. This step creates a smooth base for your sauce. - Cooking tortellini Carefully add ten ounces of refrigerated cheese tortellini to the pot. Ensure they are fully submerged in the liquid. Turn the heat up slightly to bring the mixture to a gentle simmer. Cook for five to seven minutes. Stir occasionally until the tortellini are tender. - Adding cheese and seasoning Once the tortellini are cooked, reduce the heat to low. Stir in one cup of grated Parmesan cheese and one teaspoon of Italian seasoning. Mix continuously until the cheese melts. This creates a rich, creamy sauce that coats the tortellini. - Incorporating spinach Add two cups of roughly chopped fresh spinach to the pot. Stir and cook for two to three minutes. The spinach will wilt and blend into the dish, adding color and nutrition. - Adjusting seasoning Finally, taste the dish. Add salt and freshly ground black pepper to suit your taste. If needed, adjust the seasoning for the perfect flavor. Serve hot, garnished with fresh basil leaves for a lovely touch. Choosing the right tortellini I prefer using refrigerated cheese tortellini. It cooks quickly and tastes fresh. Look for good quality brands that use real cheese. Fresh tortellini makes a big difference in flavor. Best practices for sautéing garlic When sautéing garlic, heat the olive oil until it shimmers. Add the minced garlic and stir it for about one minute. This way, it gets fragrant and golden without burning. Keep an eye on it! Burnt garlic can ruin your dish. Cooking times for tortellini Cook the tortellini in the broth and cream for about 5-7 minutes. Stir occasionally to make sure they cook evenly. You want them tender but still al dente for the best texture. How to enhance flavors To boost flavors, add freshly grated Parmesan cheese slowly. This helps it melt well and coat the tortellini. Season with salt and black pepper to taste. Fresh spinach adds a nice touch, too. If you want more flavor, try adding red pepper flakes or fresh herbs. {{image_4}} You can change things up with different greens. Instead of spinach, try kale or arugula. Both add great flavor and a nice crunch. You can also use Swiss chard for a slightly sweeter taste. Cheese is key in this dish. If you want a twist, use mozzarella or fontina. They melt well and offer a creamy texture. For a sharper flavor, try using aged cheddar. Want to add protein? Chicken or shrimp works great here. Cook the protein first, then add it back to the pot with the tortellini. You can even use cooked sausage for a hearty option. If you love heat, add red pepper flakes. Just a pinch can make your dish pop. Start small, then taste as you go. Sautéed mushrooms are another fun addition. They add an earthy flavor and a nice texture. Cook them with the garlic for extra depth. You can also add a splash of white wine for a more complex taste. To keep your One-Pot Alfredo Spinach Tortellini fresh, store leftovers right. Place them in an airtight container. Make sure the dish cools down to room temperature before sealing. This helps prevent moisture buildup. You can store it in the fridge for up to three days. I recommend using glass containers for storage. They are durable and do not stain. If you prefer plastic, choose BPA-free ones. Make sure the containers are well-sealed to keep your tortellini fresh. When it’s time to enjoy your leftovers, reheat gently. Place the tortellini in a pot over low heat. Add a splash of vegetable broth or cream to keep it creamy. Stir often to avoid sticking. To keep the sauce rich, avoid high heat. Rapid boiling can cause the cream to separate. Make sure to stir in liquid slowly. This will help maintain that delicious creamy texture you love. Can I use frozen tortellini? Yes, you can use frozen tortellini. Just add a few extra minutes to the cooking time. Frozen tortellini cooks well in the creamy sauce. Is there a dairy-free option? Yes! You can use a dairy-free cream and nutritional yeast for cheese flavor. Try coconut cream for a rich taste. How long does it take to cook tortellini from frozen? It takes about 7-10 minutes to cook frozen tortellini in the sauce. Stir gently to prevent sticking. Can I prep this dish in advance? You can prep some ingredients ahead. Chop spinach and mince garlic. Cook it fresh for the best taste and texture. What can I serve with One-Pot Alfredo Spinach Tortellini? Serve this dish with a fresh salad or garlic bread. A light wine, like Pinot Grigio, pairs nicely too. In this blog post, we covered the essential ingredients for One-Pot Alfredo Spinach Tortellini. You learned the step-by-step instructions to make this dish easy and quick. We also shared tips to perfect your cooking and variations to try. This meal not only tastes great but also offers many ways to make it your own. Enjoy creating your own version and savoring every bite. Cooking can be fun and rewarding when you experiment with flavors!

One-Pot Alfredo Spinach Tortellini Delightful Meal

- 200g feta cheese, diced into cubes - 500g cherry tomatoes, halved - 4 cloves garlic, finely minced - 1 medium onion, finely diced Feta cheese gives this soup its creamy base. Use high-quality feta for the best taste. Cherry tomatoes add sweetness and color. The garlic and onion bring depth to the flavor. - 1 tablespoon extra-virgin olive oil - 2 cups vegetable broth - 1 teaspoon dried oregano - 1 teaspoon red pepper flakes (optional for added spice) - Salt and freshly ground black pepper to taste - ½ cup heavy cream (or substitute with coconut cream for a lighter alternative) Olive oil helps the ingredients roast well. Vegetable broth adds a rich layer of flavor. Oregano and red pepper flakes can boost the taste. Adjust salt and pepper to your liking. The cream makes the soup rich and smooth. - Fresh basil leaves for garnish - Additional toppings like croutons or cheese Fresh basil adds a bright touch to the soup. You can also use croutons for crunch or extra cheese for creaminess. These toppings make your dish look and taste even better. First, set your oven to 200°C (400°F). This heat helps the tomatoes burst and the feta to melt. Next, gather your ingredients. You need: - 500g cherry tomatoes, halved - 200g feta cheese, diced into cubes - 4 cloves garlic, finely minced - 1 medium onion, finely diced - 1 tablespoon extra-virgin olive oil - 1 teaspoon dried oregano - 1 teaspoon red pepper flakes (optional) - Salt and freshly ground black pepper to taste Combine the halved cherry tomatoes, cubed feta, minced garlic, and diced onion in a large baking dish. Drizzle the olive oil over the top. Add the oregano, red pepper flakes, and salt. Toss everything together. Now, place the baking dish in your preheated oven. Roast for about 25-30 minutes. You want the tomatoes to burst and the feta to turn golden. The aroma will fill your kitchen, making your mouth water. Once roasted, take the dish out of the oven carefully. Transfer the hot mixture into a blender. Pour in 2 cups of vegetable broth and add ½ cup of heavy cream. Blend on high speed until smooth. Taste the soup and add more salt or pepper if you want. Pour the blended soup back into a pot. Heat it over medium-low for about 5 minutes. Stir it gently so it heats evenly. Serve your creamy soup hot, topped with fresh basil leaves. Enjoy with crusty bread or crackers for a delightful meal! Seasoning is key to great soup. Salt brings out the flavors. You want to taste every ingredient! Black pepper adds warmth. If you like spice, add red pepper flakes or a dash of hot sauce. Remember, you can always add more seasoning, but you can’t take it out once it’s in. So, start small and taste as you go. For a smooth soup, blend it well. I recommend using a high-speed blender. If you want a creamier texture, add heavy cream or try coconut cream. Coconut cream is a lighter choice and adds a unique flavor. If you want a thicker soup, let it simmer longer after blending. The longer it cooks, the thicker it gets. This soup pairs well with crusty bread. A fresh baguette is perfect for dipping. You can also serve it with crunchy crackers or a simple salad. For a nice touch, drizzle some olive oil on top before serving. Garnish with fresh basil leaves to add color and flavor. A sprinkle of cheese can add richness too. Enjoy your meal! {{image_4}} To make this soup lighter, you can use different creams. Instead of heavy cream, try coconut cream. It adds a nice flavor and cuts calories. If you want to lower sodium, use low-sodium vegetable broth. You still get great taste without too much salt. You can boost the flavor with fresh herbs. Basil is great, but try adding thyme or rosemary, too. They bring new tastes to your soup. For more protein, mix in cooked chicken or chickpeas. This makes the soup heartier and more filling. Make this soup a full meal by adding crusty bread or a salad. You can also serve it cold on hot days. Just blend it well and chill in the fridge. Cold soup can be refreshing and tasty, perfect for summer. To keep your soup fresh, place it in an airtight container. Store it in the fridge. This soup stays good for about 3 to 5 days. Make sure it cools down before you seal it up. You can reheat the soup on the stove or in the microwave. If you use the stove, warm it over medium heat. Stir it often to keep it from sticking. For the microwave, heat it in short bursts. Stir in between to keep it smooth. This helps maintain the creamy texture. If you want to freeze the soup, let it cool first. Pour it into freezer-safe containers. Leave some space at the top for expansion. The soup can last up to 3 months in the freezer. When you’re ready to eat, thaw it in the fridge overnight. Reheat it on the stove as mentioned above. Enjoy your tasty meal! Yes, you can make this soup vegan. Here’s how: - Replace feta cheese with firm tofu. - Use coconut cream instead of heavy cream. - Ensure your vegetable broth is vegan-friendly. These swaps keep the flavor rich and creamy. To add heat, try these ingredients: - Add more red pepper flakes. - Mix in chopped fresh chili peppers. - Include a dash of hot sauce. These options will give your soup a nice kick. This soup pairs well with: - Crusty bread for dipping. - Crunchy crackers for texture. - A fresh salad for balance. These sides make your meal complete and delicious. This blog post covered the key ingredients and steps for making TikTok Feta and Tomato Soup. You learned about the main components, seasoning, and garnishes that elevate the dish. I shared tips to perfect the flavor and achieve the right texture. Remember, variations can make the soup even better. Storing, reheating, and serving suggestions are crucial for enjoying every last bite. Ultimately, this soup is easy to make and customize. I hope you feel inspired to create your own delicious version. Enjoy your cooking!

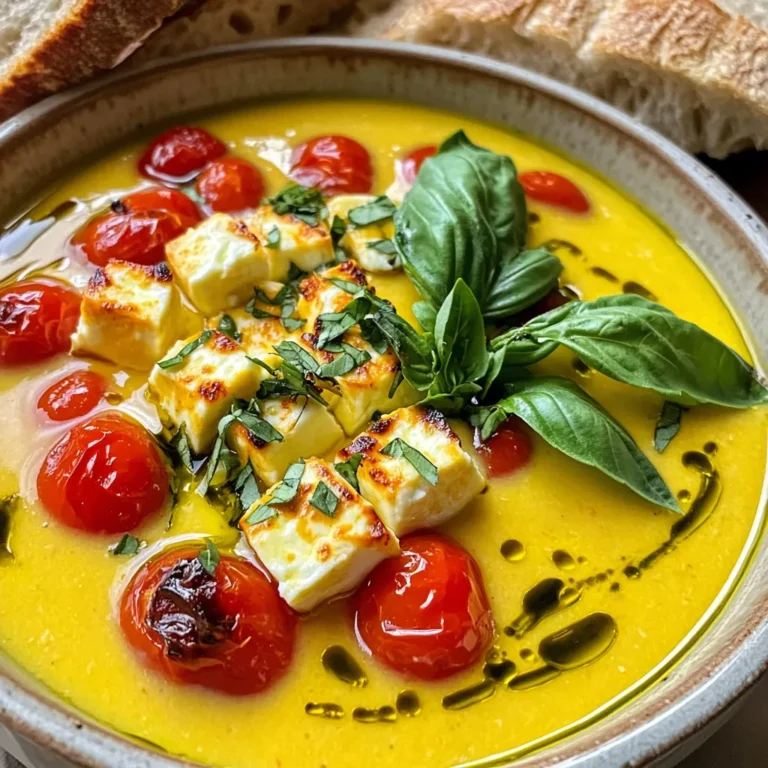
TikTok Feta and Tomato Soup Simple and Delicious Recipe

To make creamy roasted butternut squash rigatoni, gather these key ingredients: - Butternut squash - Olive oil - Sea salt and black pepper - Rigatoni pasta - Vegetable broth - Heavy cream or coconut cream - Garlic powder - Onion powder - Nutmeg - Parmesan cheese or nutritional yeast - Fresh baby spinach - Fresh sage leaves Each ingredient plays a role in the dish's flavor and texture. The butternut squash adds a sweet, nutty taste. Olive oil helps with roasting and enhances flavor. Sea salt and black pepper bring out the best in each bite. Rigatoni pasta gives a hearty base to the dish. Vegetable broth adds depth to the sauce. Heavy cream or coconut cream creates that creamy texture. Garlic powder and onion powder provide savory notes. Nutmeg adds warmth and a hint of spice. Grated Parmesan cheese or nutritional yeast gives a rich, cheesy flavor. Fresh baby spinach adds color and nutrition, while sage leaves make a perfect garnish. Each ingredient works together to create a comforting meal that’s not just tasty but also visually appealing. 1. Preheating the oven: Start by setting your oven to 400°F (200°C). This warm temperature helps the squash caramelize nicely. 2. Seasoning the squash: Take your peeled and diced butternut squash. Toss it in a bowl with 1 tablespoon of olive oil, sea salt, and black pepper. Make sure every piece is coated. 3. Roasting technique and timing: Spread the squash on a baking sheet in a single layer. Roast it for 25-30 minutes. Toss it halfway through for even cooking. The squash is ready when it's tender and golden. 1. Boiling water: While the squash roasts, fill a large pot with salted water. Bring it to a rolling boil. 2. Cooking instructions for al dente: Add 12 ounces of rigatoni to the boiling water. Cook according to the package instructions. Drain the pasta but save about 1/2 cup of the water for later. 1. Blending roasted squash with liquid ingredients: In a blender, combine the roasted squash, 1 cup of vegetable broth, 1 cup of heavy cream or coconut cream, 1 teaspoon of garlic powder, 1 teaspoon of onion powder, and 1/2 teaspoon of nutmeg. 2. Adjusting sauce consistency: Blend until smooth. If the sauce is too thick, add some reserved pasta water to reach the desired creaminess. 1. Incorporating rigatoni and spinach: Return the empty pot to the stove. Pour in the creamy sauce and heat for about 5 minutes. Stir in 1 cup of grated Parmesan cheese until melted. 2. Final cooking steps: Add the cooked rigatoni and 1 cup of fresh spinach. Toss until everything is well coated. Cook for another 2-3 minutes until the spinach wilts. Taste and adjust seasoning if needed. Serve hot, garnished with fresh sage leaves and more Parmesan if desired. To ensure even roasting of the squash, spread the cubes in a single layer on the baking sheet. Toss them halfway through cooking. This helps them brown and caramelize evenly. When blending the sauce, make sure to stop and scrape down the sides of the blender. This will help you achieve a smooth sauce without lumps. Adjust the seasoning to your taste. You can add more salt or pepper as needed. For a burst of fresh flavor, consider adding a squeeze of lemon juice. For garnishing, fresh sage leaves add a lovely touch. You can also sprinkle extra Parmesan cheese on top for added richness. For a beautiful plate, serve the rigatoni in shallow bowls. Drizzle the sauce over the pasta and add a sprig of fresh sage on top. This not only looks great but tastes amazing too. Pair your dish with a crisp white wine or a light salad on the side. This will enhance your meal's flavors and make it even more delightful. {{image_4}} You can make this dish dairy-free. Use coconut cream instead of heavy cream. It adds a nice, subtle sweetness. For cheese, try vegan cheese options. Nutritional yeast works well, giving a cheesy flavor without dairy. Feel free to swap out some veggies. Carrots, sweet potatoes, or even kale can add great flavor. You can also change the pasta type. Penne, fusilli, or even gluten-free pasta can work. Make this dish shine in any season. For fall, add warm spices like cinnamon or allspice. In winter, use fresh herbs like rosemary or thyme. They bring a cozy touch to your rigatoni. Store leftovers in an airtight container. This keeps the creamy sauce fresh. You can refrigerate it for up to three days. When you are ready to eat, reheat the rigatoni on the stove over low heat. Add a splash of water or broth to keep it creamy. Stir often to avoid burning. You can freeze this dish if you have too much. Place it in a freezer-safe container. Make sure to leave some space for expansion. It can last for about two months in the freezer. When you're ready to eat, thaw it in the fridge overnight. To reheat, warm it on the stove or microwave. Add a bit of cream or broth to revive the sauce. Stir until it’s heated through and creamy again. Enjoy your delicious meal anytime! Yes, you can use frozen butternut squash. Just thaw it before cooking. The texture may vary, but it can still taste great in this dish. You might need to adjust the roasting time since frozen squash may cook faster. To add spice, try these options: - Add red pepper flakes to the sauce. - Mix in some diced jalapeños or chili peppers. - Stir in a dash of hot sauce before serving. These will give your rigatoni a nice kick. This dish pairs well with: - A fresh green salad. - Garlic bread or crusty rolls. - A light white wine, like Pinot Grigio. These sides balance the creamy rigatoni. Yes, you can prepare the sauce and cook the pasta ahead of time. Store them separately in the fridge. When ready to serve, heat the sauce and toss it with the pasta. This saves time and keeps the dish fresh. Your butternut squash is ready when it is tender and slightly caramelized. You can test it by poking a piece with a fork. If it goes in easily, it’s done. The edges should be golden brown for the best flavor. In this blog post, we explored the creamy roasted butternut squash rigatoni recipe. You learned about the key ingredients, step-by-step instructions, and valuable tips for success. We also discussed variations to make it fit your needs. Remember, cooking is fun and this dish is both warming and delicious. With fresh flavors and simple steps, you can impress anyone at your table. Take these ideas and create your unique version. Enjoy your cooking journey!

Creamy Roasted Butternut Squash Rigatoni Delight

- 4 salmon fillets (about 6 oz each) - 1 bunch of asparagus, trimmed - 2 tablespoons olive oil - 2 tablespoons fresh lemon juice - 2 cloves garlic, finely minced - 1 teaspoon lemon zest - 1 teaspoon dried oregano - 1 teaspoon dried basil - Sea salt and black pepper to taste - Lemon slices for garnish - Fresh parsley, chopped for a touch of color When I create this dish, I focus on fresh, high-quality ingredients. Salmon is a great source of protein and omega-3 fatty acids. It gives a rich flavor that pairs well with the bright notes of lemon. Asparagus adds a nice crunch and a pop of color on the plate. I love the simplicity of olive oil, lemon juice, and garlic. They blend perfectly to enhance the fish and veggies. The herbs like oregano and basil add a lovely aroma and taste. They make this dish feel special without extra work. For garnish, fresh parsley adds a burst of green. Lemon slices bring a cheerful look and a hint of zest. Using these ingredients makes the meal not only tasty but also beautiful. This is how I keep cooking fun and enjoyable! - Preheat your oven to 400°F (200°C). - Line a large baking sheet with parchment paper. - In a small bowl, whisk together: - 2 tablespoons olive oil - 2 tablespoons fresh lemon juice - 1 teaspoon lemon zest - Add: - 2 cloves garlic, finely minced - 1 teaspoon dried oregano - 1 teaspoon dried basil - Sea salt and freshly ground black pepper to taste - Place the salmon fillets skin-side down on one side of the sheet pan. - Generously apply half of the herb mixture to the salmon. - Arrange the trimmed asparagus on the other side. - Drizzle the rest of the herb mixture over the asparagus and toss lightly. - Bake for 12-15 minutes at 400°F. - Check doneness by ensuring the salmon flakes easily with a fork. - The asparagus should be tender yet crisp. To get the best salmon, cook it until it reaches 145°F. This is the ideal internal temperature for salmon. You can use a food thermometer to check. To avoid overcooking, keep an eye on the time. Salmon cooks fast, usually in 12-15 minutes. Look for it to flake easily with a fork. If it’s still tough, it needs more time. When choosing asparagus, look for bright green color. The spears should be firm and tight. Avoid ones that are limp or have wrinkled tips. For the best tenderness, snap the ends off. This will remove the tough parts. You can also peel the lower parts for a softer bite. For plating, place the salmon and asparagus side by side. This makes a colorful and inviting dish. Drizzle a bit of extra lemon juice over the top for shine. Use fresh parsley to add a pop of green. Lemon slices can also add a bright touch. You can even place them on top of the salmon. This makes your meal look and taste even better! {{image_4}} You can swap salmon for chicken or shrimp. Chicken works well because it absorbs flavors nicely. Simply adjust the cooking time; chicken may need a bit longer to cook. For shrimp, choose large ones. Toss them in the herb mix and bake for about 8-10 minutes. Both options keep the meal tasty and easy. If you don't have asparagus, use green beans or broccoli. These veggies roast well and add a nice crunch. You can also try bell peppers or zucchini. Slice them into even pieces for cooking. Toss them in the same herb mix for a burst of flavor. Feel free to mix and match for fun! Add flair by using different herbs or spices. Try dill or thyme for a new taste. You can also use flavored oils, like garlic or chili oil, to give a kick. Vinegars, like balsamic or red wine, can brighten the dish too. Experiment with these to find your perfect blend. To keep your cooked salmon and asparagus fresh, cool them first. Place them in an airtight container. Store in the fridge for up to three days. This helps lock in flavors. Avoid using metal containers, as they can affect taste. Use glass or plastic instead. When you reheat salmon, use low heat to keep it moist. The oven is best for even heating. Preheat your oven to 275°F (135°C). Place the salmon on a baking sheet. Cover it with foil to keep moisture in. Warm for about 15 minutes. If using a microwave, heat in short bursts. This prevents drying out. Use a lower power setting for best results. You can freeze both cooked and uncooked portions. For cooked salmon, let it cool completely. Wrap it tightly in plastic wrap, then foil. Label and freeze for up to three months. For uncooked salmon, freeze it in its original packaging, or wrap it well. Thaw in the fridge overnight for best results. Avoid defrosting in warm water, as it can cook the fish unevenly. Salmon usually takes about 12 to 15 minutes to bake at 400°F (200°C). It should be opaque and flake easily with a fork when done. Cooking time can vary with the thickness of the fillet. Yes, you can use frozen salmon. Just make sure to thaw it first. Place it in the fridge overnight or run it under cold water for a quicker thaw. This helps ensure even cooking. Lemon herb salmon tastes great with many sides. Here are a few options: - Brown rice or quinoa - Mixed green salad - Roasted potatoes - Garlic bread These sides will complement the flavors of the salmon. Absolutely! You can make the lemon herb mixture ahead of time. Just store it in an airtight container in the fridge. It will stay fresh for up to three days. This saves time when you're ready to cook. Yes, there are many low-carb sides to enjoy with this dish. Some good choices include: - Cauliflower rice - Steamed broccoli - Sautéed spinach - Zucchini noodles These options keep the meal healthy while adding variety. This recipe for lemon herb salmon serves as a quick and tasty meal. We covered the main ingredients, like salmon and asparagus, and learned how to mix the herbs. You now know tips for perfect cooking and ways to swap ingredients for variety. Remember, you can store leftovers and even freeze portions for later use. I hope these ideas inspire you to enjoy cooking at home and try new flavors. Happy cooking!

Sheet-Pan Lemon Herb Salmon and Asparagus Delight

- 1 cup coconut milk - 1 cup almond milk - 1/4 cup chia seeds - 2 tablespoons maple syrup (or honey) - 1 ripe mango, diced - 1/2 teaspoon vanilla extract - Pinch of salt - Toasted coconut flakes - Fresh mint leaves What are the nutritional values of chia seeds? Chia seeds are small but mighty. They are rich in fiber, protein, and omega-3 fatty acids. Just two tablespoons provide you with a good amount of calcium, magnesium, and antioxidants. These nutrients support heart health and can help you feel full longer. What are the benefits of coconut milk? Coconut milk is creamy and delicious. It has healthy fats called medium-chain triglycerides (MCTs). MCTs can boost your energy and may help with weight loss. Coconut milk also adds a rich flavor to dishes without dairy. Why is mango considered a superfood? Mango is more than just sweet and juicy. It is packed with vitamins A and C, which are great for your skin and eyes. Mango also contains fiber, which supports your digestion. Plus, it adds a bright flavor that makes any dish shine. These ingredients not only make your mango coconut chia pudding tasty but also boost your health with every spoonful. Enjoy this treat knowing you're nourishing your body! You need about 10 minutes to prepare this dish. After mixing, let the pudding chill for at least 4 hours, or overnight for the best texture. First, grab a medium-sized mixing bowl. Pour in 1 cup of coconut milk and 1 cup of almond milk. Add 2 tablespoons of maple syrup (or honey) for sweetness. Then, mix in 1/2 teaspoon of vanilla extract and a pinch of salt. Whisk everything together until it is smooth and well-blended. Next, gently fold in 1/4 cup of chia seeds. Make sure there are no clumps. Let the mixture sit for about 5 minutes. This is key, as it helps the chia seeds absorb the liquid. After 5 minutes, whisk again to spread the chia seeds evenly. This ensures they won’t sink to the bottom. Now, cover the bowl with plastic wrap or a lid. Place it in the fridge for at least 4 hours. For a thicker pudding, leave it overnight. This chilling time allows the chia seeds to expand and gives the pudding its creamy texture. After chilling, take the pudding out of the fridge. Stir it well for a smooth finish. To serve, use clear glass cups or bowls. Start with a layer of chia pudding, followed by a layer of diced mango. Repeat these layers until you reach the top. Make sure to finish with a layer of mango for a bright look. Garnish each cup with toasted coconut flakes and a few fresh mint leaves. This adds a nice touch to your pudding. To avoid clumps, whisk the base well after adding chia seeds. I recommend whisking for about a minute. This helps mix everything well. After letting it sit for 5 minutes, whisk again. This final whisk will ensure the chia seeds spread out evenly. You’ll know the pudding is ready when it feels thick and creamy. Garnish your pudding with toasted coconut and fresh mint leaves. This adds flavor and makes it look beautiful. Use clear glass cups for serving. This way, you can show off the vibrant layers of mango and pudding. If you want a creamy touch, drizzle some extra coconut milk on top just before serving. If you want to change the sweetness, try using honey instead of maple syrup. You can also add more or less based on your taste. For a unique twist, consider using agave syrup or stevia. Start with less sweetener, then taste and adjust to your liking. This makes your pudding perfect for your sweet tooth! {{image_4}} You can easily change the taste of your mango coconut chia pudding. Adding a pinch of cinnamon or nutmeg gives a warm spice. These spices add a nice twist without overpowering the flavors. You can also mix in other fruits. Fresh berries like strawberries or blueberries add a burst of color and taste. Kiwi slices add a tangy flavor too. The fun part is you can experiment and find your favorite mix! If you want more flavor, try different milk options. You can use oat milk or soy milk instead of almond milk. Each milk type brings its unique taste to the pudding. For sweetness, consider vegan options like agave syrup or date syrup. These options keep your pudding plant-based and delicious. Making chia pudding parfaits is a fun way to serve this treat. Layer the chia pudding with yogurt for added creaminess. You can also add granola for crunch. This adds a nice texture contrast. Try using clear cups or jars to show off the layers. You can even top it off with extra mango or a drizzle of coconut milk for a gorgeous finish. This makes your pudding not just tasty, but also beautiful! To store leftover pudding, place it in an airtight container. This keeps it fresh and tasty. You can also cover the bowl with plastic wrap. The pudding should last about 3 to 5 days in the fridge. Check for any signs of spoilage before enjoying it again. If you want to store it longer, freeze the pudding. Pour it into freezer-safe containers, leaving some space at the top. This allows for expansion. When you want to eat it, take it out and thaw it in the fridge overnight. The texture may change slightly, so stir well after thawing to restore creaminess. Yes, you can use other milk types. Almond and coconut milk are great options. You can also try oat milk or soy milk. Each will add its own flavor. Just keep the same amounts in the recipe. The pudding needs at least 4 hours to chill. For the best texture, chill it overnight. This time allows chia seeds to soak up the milk. They expand and create a thick pudding. Yes, this recipe is gluten-free. Chia seeds, coconut milk, and almond milk do not contain gluten. You can enjoy this pudding without worry if you have gluten sensitivity. You can prepare this pudding in advance. Make it a day ahead for a quick treat. Store it in the fridge in an airtight container. It stays fresh for up to 5 days. This makes it perfect for meal prep! This blog post covered a simple and tasty chia pudding recipe. You learned about the ingredients, health benefits, and step-by-step instructions. I shared tips for perfect texture and easy variations. With the right mixing and chilling, your chia pudding can be both creamy and refreshing. You now have everything you need to impress friends with delicious and healthy servings. Enjoy experimenting with flavors and making this pudding your own!

Mango Coconut Chia Pudding Refreshing and Healthy Treat

- 12 ounces cheese tortellini - 1 cup cherry tomatoes, halved - 1 cup baby spinach, roughly chopped - ½ cup creamy pesto (store-bought or homemade) - ¼ cup cream cheese, softened - 3 tablespoons extra virgin olive oil - 1 tablespoon fresh lemon juice - Salt and freshly cracked black pepper, to taste - ¼ cup pine nuts, toasted until golden - Grated Parmesan cheese, for garnish In this salad, the cheese tortellini is the star. It gives a nice bite and cheesy flavor. Cherry tomatoes add sweetness and color. Baby spinach brings a fresh, green crunch. Creamy pesto makes everything rich and flavorful. Cream cheese helps bind it all together. Olive oil and lemon juice add a bright finish. Toasted pine nuts give a delightful crunch. Lastly, a sprinkle of Parmesan cheese enhances the flavor. - Extra cherry tomato halves - A drizzle of olive oil - Fresh basil leaves These optional toppings can make your salad look even better. They add more color and flavor. Fresh basil gives a nice herb taste. You can also use more Parmesan if you love cheese. - Large pot for cooking tortellini - Mixing bowl - Whisk - Spatula or wooden spoon - Colander for draining tortellini - Serving dish These tools help you make the salad easily. A large pot lets you cook the tortellini right. A mixing bowl is perfect for combining the creamy pesto and cream cheese. A whisk helps mix everything smoothly. Use a spatula or wooden spoon to gently toss the salad. Finally, a colander drains the tortellini well, and a nice serving dish makes it look great. Start by boiling water in a large pot. Once it reaches a rolling boil, add 12 ounces of cheese tortellini. Cook them for 3-5 minutes until they are al dente. Once done, drain the tortellini in a colander. Rinse them under cold water to stop the cooking. Let them cool for a few minutes while you prepare the rest. In a large mixing bowl, take ½ cup of creamy pesto and ¼ cup of softened cream cheese. Use a whisk to mix them until smooth and creamy. This will be the base of your salad. Make sure there are no lumps. The creamy pesto will add great flavor to the dish. Now, it’s time to bring everything together. Add the cooled tortellini to the bowl with the creamy pesto. Then, toss in 1 cup of halved cherry tomatoes and 1 cup of roughly chopped baby spinach. Drizzle in 3 tablespoons of extra virgin olive oil and 1 tablespoon of fresh lemon juice. Use a spatula to mix gently. Make sure every piece is coated well. Taste your salad and add salt and freshly cracked black pepper to your liking. Finally, fold in ¼ cup of toasted pine nuts for a nice crunch. Transfer your salad to a serving dish and top it with grated Parmesan cheese. For the best taste, let it chill in the fridge for 30 minutes. Enjoy your creamy pesto tortellini salad! To cook tortellini just right, follow these steps: - Bring a large pot of salted water to a boil. - Add the tortellini and stir gently. - Cook for 3-5 minutes until al dente. - Drain the tortellini in a colander. - Rinse under cold water to stop cooking. This keeps the tortellini firm and tasty. To make this dish pop, try these tips: - Use fresh lemon juice for a bright taste. - Add a pinch of salt and cracked black pepper. - Toast the pine nuts for a richer flavor. - Let the salad rest in the fridge for 30 minutes. This helps all the flavors mix well together. Here are some great ways to serve your salad: - Use a clear bowl to show off the colors. - Top with extra cherry tomato halves for style. - Drizzle olive oil on top right before serving. - Pair with grilled chicken or crusty bread for a meal. These ideas will make your salad even more appealing. {{image_4}} You can use many types of pesto in this dish. Traditional basil pesto works well. You might also try sun-dried tomato pesto for a richer taste. Spinach pesto adds a fresh twist. For a nut-free option, use pumpkin seeds instead of pine nuts. Boost the salad's nutrition easily. You can add cooked chicken or turkey for extra protein. Chickpeas are great for a plant-based boost. Bell peppers add crunch and color. Avocado gives a creamy texture and healthy fats. Try adding some chopped nuts for extra crunch and flavor. For a gluten-free version, use gluten-free tortellini. They are widely available now. For a vegan salad, skip the cheese and use a vegan cream cheese. You can also use nutritional yeast for a cheesy flavor. Make sure your pesto is vegan, using ingredients like cashews and spinach. To keep your creamy pesto tortellini salad fresh, store it in an airtight container. Make sure it is sealed tightly. This helps to prevent the salad from drying out or absorbing other odors from the fridge. If you have extra cherry tomatoes or pine nuts, store those in separate containers. This keeps them fresh and prevents sogginess. When stored properly, creamy pesto tortellini salad can last in the fridge for about 3 to 5 days. Always check for any changes in smell or appearance before eating. If you notice anything off, it’s best to throw it out. The flavors may intensify over time, but the salad should still taste good within that timeframe. I do not recommend freezing creamy pesto tortellini salad. The texture of the tortellini and greens can change when thawed. However, if you want to freeze it, do so without the fresh ingredients like spinach and tomatoes. The creamy pesto sauce can freeze well. When you’re ready to use it, thaw it in the fridge overnight and mix it with fresh ingredients before serving. Yes, you can use store-bought pesto. It saves time and effort. Look for a high-quality brand. A good pesto should taste fresh and vibrant. Always check the ingredients for the best flavor. Making homemade pesto is easy. You need fresh basil, garlic, pine nuts, olive oil, and Parmesan cheese. 1. Blend 2 cups of fresh basil leaves with 2 cloves of garlic. 2. Add ¼ cup of pine nuts and ½ cup of grated Parmesan. 3. Slowly drizzle in ½ cup of olive oil while blending. 4. Season with salt and pepper to taste. This will give you a fresh and flavorful pesto. Creamy Pesto Tortellini Salad pairs well with many dishes. Try serving it with grilled chicken or shrimp for protein. A side of garlic bread or a fresh green salad complements it nicely too. You can also enjoy it as a light meal on its own. Yes, this salad is great for meal prep. It keeps well in the fridge for a few days. Just store it in an airtight container. To keep it fresh, add the pine nuts just before serving. This way, they stay crunchy and tasty. This blog post covered how to make a tasty creamy pesto tortellini salad. We explored the key ingredients and optional toppings, along with helpful kitchen tools. I provided step-by-step instructions for cooking the tortellini and mixing the creamy pesto. You learned tips for perfect texture and flavor, plus variations to fit your needs. Finally, we discussed storage and answered common questions. Now, you have everything you need to create this delightful dish at home! Enjoy your cooking adventure and savor every bite of your salad!

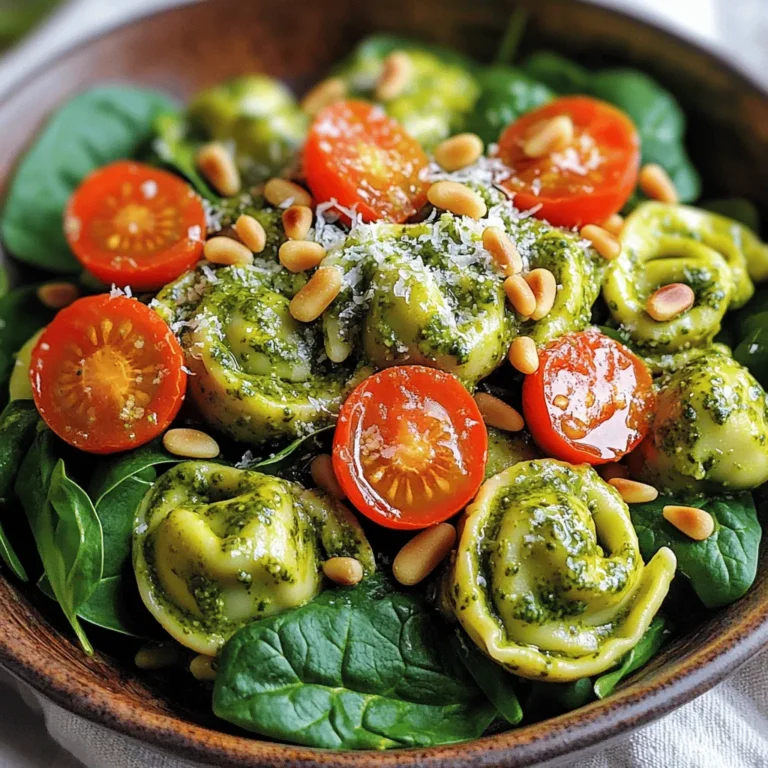
Creamy Pesto Tortellini Salad Fresh and Flavorful Dish

1 2 … 10 NEXT
crunchy chronicle

explore

DessertsDinnerAppetizersDrinks

Our Policies

  • Cookie Policy
  • Copyright Policy
  • Disclaimer
  • GDPR Policy
  • Terms Of Use
Back to Top
  • About
  • Contact Us
  • Privacy Policy
© 2025 crunchy chronicle